Getting Started With IFS Containers
IBM i expert Jesse Gorzinski explains set up a container running Node.js version 10
The term “container” has become commonplace in the IT industry. It’s sometimes beneficial to work in, or deploy applications in, an isolated environment. IBM i has long had capabilities to separate and manage workloads independently, by way of subsystems, memory pools, workload capping groups, and so on. IBM i also has the capability for chroot-based containers in the QOpenSys filesystem. Today, I’ll get you started with this useful technology.
The chroot containers themselves are often called “jails.” The notion of a “jail” is actually quite simple. When a process is jailed, it can only access things that were placed inside the jail. With chroot jailing, this isolation can be applied to the QOpenSys file system. There are some limitations, which we’ll discuss later. There are some key benefits to containers. The isolation allows for developers (or applications) to run within their own sandbox, with a reduced risk of causing harm to the system. While this may sound complex, it’s actually quite simple. In today’s example, I am going to set up a container running Node.js version 10.
Step 1: Install open source package manager
As with most things open source these days, the first step is to install an open source package manager on your system. If you’re using the latest open source deliveries, you’ve already done this. In case you haven’t, visit the documentation to get started. It’ll only take a few minutes! If you’ve not heard of an open source package manager before, read one of my previous posts, “Open Source Has Never Tasted So Good” to learn about all the scrumptious capabilities. Don’t forget to add /QOpenSys/pkgs/bin to your PATH, per these instructions.
Step 2: Install the ‘ibmichroot’ package
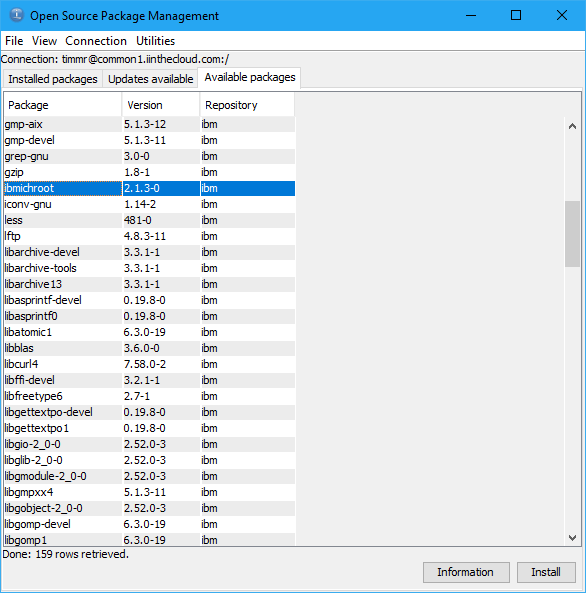
Now that you have an open source package manager, you can use it to install the “ibmichroot” package. This package provides a number of scripts for simplifying the use of containers. It’s fully open source, of course, and was developed in collaboration with community members. It is now delivered in RPM form for maximum convenience! Installing ibmichroot is done just like any other RPM package. From a shell, you can just run “yum install ibmichroot”. Of course, this function is also at your fingertips with IBM i Access Client Solutions (ACS). The new “Open Source Package Management” utility will show “ibmichroot” in the “Available Packages” list.
Step 3: Create a chroot container
Now you’re ready to make a container! Again, it’s not as hard as you may think. In this example, I will make a container at /QOpenSys/jesse_chroots/node10. To do so, I simply run “chroot_setup node10” from a newly-created /QOpenSys/jesse_chroots directory.
After I respond to a couple questions, the script will populate the directory with everything needed for a minimally-operational container. That means I can use a shell and a couple PASE commands. Had I not done this step, my “jail” would be worthless, since even basic UNIX commands (ls, cd, pwd) would not be there. The ibmichroot project also provides some knowledge of some other basic chroot types. For instance, if I run “chroot_setup node10 nls” it would also load globalization support. This is recommended if you will be using bash or other software that uses locale data inside of the container.
Step 4: Load software into the container
Now that you have a minimally-functional container, you probably want to load some useful things into it. If you are loading your own files or software, this can be as simple as copying files into the chroot directory. However, the “yum” package manager also understands chroot containers, and so does the ACS interface! To use “yum” on the command line, just use the –installroot argument. So, for today’s task, that would be the following command:
yum –installroot=/QOpenSys/jesse_chroots/node10 install nodejs10
From the ACS interface, you can leverage the oft-ignored “Container” field when connecting the Open Source Package Management utility. In this demo, I am using the COMMON User Group demo system provided by the great folks at www.iinthecloud.com.
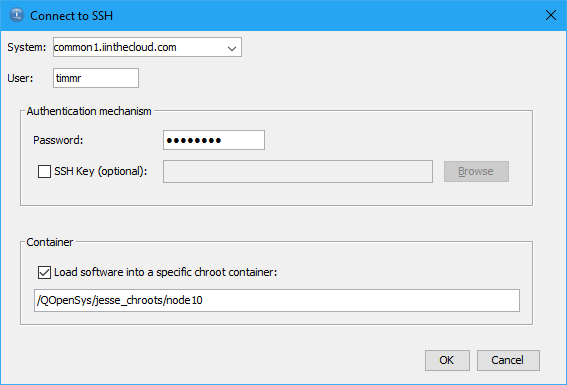
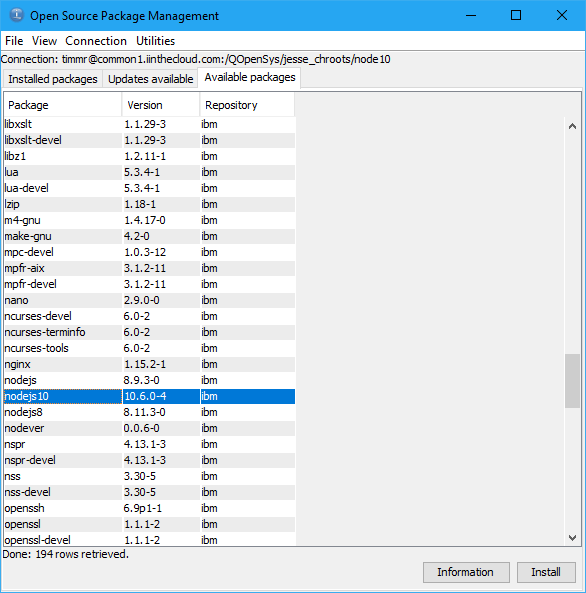
When you do that, the ACS utility can be used to manage the open source installed in the given container. So, we can just find “nodejs10” on the list of available packages and install it! Note how the chroot path is indicated on the toolbar when connected to a container.
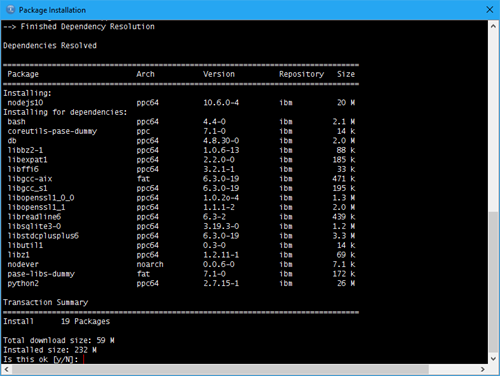
Of course, it will require several dependencies because we’ve only loaded a few things into the container.
If you’re following along, you might want to install the “openssh” package as well. We’ll use that later.
Step 5: Use the container
There are several ways to use the container you have just created. One way is to explicitly invoke the “chroot” command. The chroot command’s first argument takes the path of the chroot. After that, you can tell it a specific command to run inside the chroot.
The following screenshot demonstrates how to run the bash shell inside my new chroot:

All I did was run “chroot node10” (remember, “node10” is the directory name). It works because my user profile’s default shell is set to bash, and bash got installed as part of the node 10 RPM install we did in step 4. Note, however, once I run the “chroot” command, I have my own sandbox, and am effectively inside the container. A quick way to verify this would be to just check to see if /qsys.lib exists. As you can see in the above screenshot, it does not. All I can see is what was loaded into the chroot. In case you don’t have your default shell set to bash or you don’t have your PATH environment variable set up, you can explicitly invoke these things inside your jail. And then, of course, verify that you have Node 10 installed!

Step 6 (optional): Assign a user to the container
At this point, we’ve created a container and have installed Node.js 10 into that container. Optionally, we can assign a user to automatically enter the container when connecting via SSH. That can be done with just a couple steps. First, create or a change a user profile using a “.” directory to denote the start of the chroot container. For today’s demo, I’d like to create a new user N10USR which is assigned to the newly-created sandbox, so the CRTUSRPRF command looks like this:
CRTUSRPRF USRPRF(N10USR) HOMEDIR('/QOpenSys/jesse_chroots/node10/./home')
Also, you can elect to transfer ownership of all files inside the container to that user. This, of course, gives that user the ability to write and access any files within their jail. To do this, just run the “chown” command from a shell:
chown -R n10usr /QOpenSys/jesse_chroots/node10
Now, when that user connects with SSH, that user is automatically placed into the container. In the following screenshot, this is demonstrated by the presence of Node.js 10 as well as the lack of /qsys.lib and other familiar files and directories.

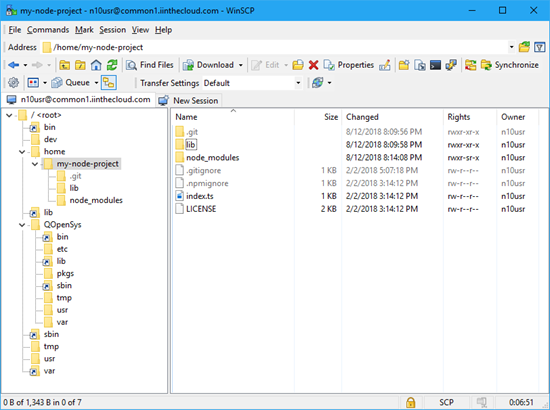
Want to take it a step further and have a graphical filesystem view of your container? You can do that, too! Just install the “openssh” RPM package (using the same steps used to install “nodejs10” earlier) into the container. My favorite client tool is WinSCP. I can configure a connection using the SCP protocol.
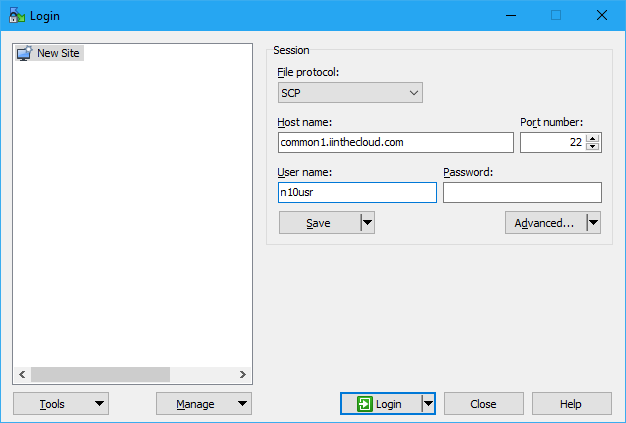
Once connected with WinSCP, I can do many of the things I’d like to from a file browser, including the drag and drop of files, renames, edit operations, and much more.
Know the limits
These chroot-based containers can be a powerful tool when leveraged properly. However, be aware that these “jails” have limitations. First and foremost, a user is only automatically placed within the container via SSH connections! It does not apply to other interfaces such as QSH or QP2TERM (in which case, a user could explicitly jail him/herself with the “chroot” command). Also, while chroot offers some isolation and security, it is far from a complete isolation from the rest of the system. For instance, an application can still connect to the database from within a chroot container to access the system database tables. Or, it could still dispatch CL commands. Remember, the chroot container technology is only supported in the QOpenSys file system. So, it’s important to maintain a security strategy that (among other things) ensures object-level permissions are set properly.
You’re just getting started!
The combination of RPMs, yum and containers give you more flexibility than ever before. These technologies can join forces to support a multitude of strategies for development, QA, or continuous delivery. In a future blog post, I plan to delve into open source management in more detail (for instance, deal with firewall restrictions or multiple partitions). In any event, I employ you to explore the abilities of IFS containers as discussed today. Being in jail isn’t always a bad thing.