ISPF for VS Code Users: Editing Multiple Files
Systems engineer Stephen Johnston shows how to split your screen and switch between files in ISPF

Navigating between multiple open files with tabs and splitting our screens six ways to Sunday are luxuries that few of us developers think about. But when we make the transition from desktop to mainframe, we begin to long for these luxuries. The good news is the functionality is there; most new-to-Z developers just don’t know how to access it.
The SWAP Command
The SWAP command is an ISPF system command that has been part of the product since its early days. Later releases increased the screen limit to eight screens and added parameters like NEXT, PREV and LIST.
Nowadays, ISPF supports up to 32 logical screens, but eight is still the default. If you’re curious, this is defined in the ISPF Configuration Table, under the keyword: MAXIMUM_NUMBER_OF_SPLIT_SCREENS.
The SWAP command syntax is:
SWAP [PREV | NEXT | LIST | screen_name | n ]
The SWAP command has five options. These are:
- PREV – Moves to the next lowest screen number. When it reaches 1, it wraps back to 32 (or your configured maximum).
- NEXT – Moves to the next highest screen number. When it reaches the last number, it will return to 1.
- LIST – Displays a pop-up dialog which displays all active logical screens.
- SCREEN_NAME – Changes focus to the desired named screen (see Setting the Screen Name)
- N – Is a number. It changes the screen to the desired screen number (1-32).
The SWAP command does not require any of these parameters, and if none are provided, it will simply change to the next logical screen.
The SWAP Key
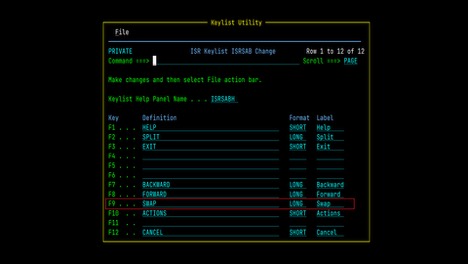
The F9 key is generally assigned as the SWAP key. Pressing this key will ignore any primary command-line entries and provide the same functionality as entering SWAP on its own. You can verify this key assignment by typing KEYS on the primary command line and pressing the Enter/Return key.
The SWAP NEXT and SWAP PREV Commands
As you add more logical screens, the plain swap becomes less useful, since it only toggles between two screens. Because of this, most users will assign SWAP NEXT and SWAP PREV to function keys, so you can cycle between screens quicker. For example, based on the available keys in Figure 1, I might assign F4 to SWAP PREV and F5 to SWAP NEXT.
The SWAP LIST Command
The SWAP LIST command displays an ISPF dialog called the ISPF Task List. The SWAP LIST command was added in Version 4.2 of ISPF—the final release of ISPF as a stand-alone product before it was integrated into OS/390 and z/OS.
The Task List dialog displays a table (or list) of all active logical screens. The column headers are:
- Screen ID – This the number (1-31) associated with the logical screen. Under the hood this value is stored in a system variable called ZSCREEN.
- Screen Name – This is what I call the friendly name. It will be blank unless you explicitly name your screen (see Setting the Screen Name), or if it has been set by an application (e.g., SDSF)
- Panel ID – The panel ID is actually the unique member name of the current screen. This is really only helpful if you’re an application developer in my opinion.
- Application ID (Applid) – This a unique ID, one to eight characters, which is used to identify a program, dialog, etc.
- Session Type – This is typically 3270.
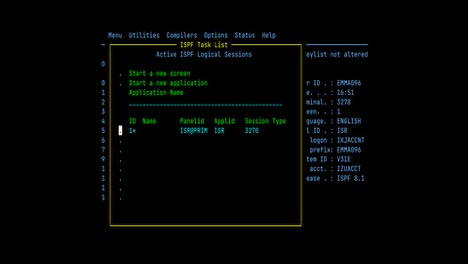
On my system, because we’re using the system default, I am limited to eight screens, which is more than enough for the average developer/user.
At the top of the dialog you see two options:
- Start a new screen – Used to start a new logical screen
- Start a new application – If this option is selected you must enter the application name into the Application Name field. When this option is selected it will use the ISPF START command to launch the application (which can include parameters too). If it’s assigned, and you need extra room, you can press the key assigned to the EXPAND command and you’ll be presented with a dialog that contains a longer field.
Starting a New Screen
To start a new logical screen, position your cursor on the Start a new screen option and press enter. At first, it may look like nothing happened, but if you type the SWAP LIST command you’ll notice that you now have two active screens.
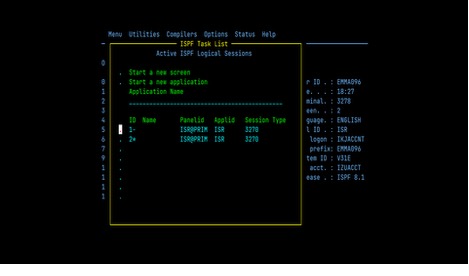
To navigate between the screens you can use the SWAP NEXT/PREV commands or use your SWAP function key (F9). If you’d like to close the dialog you can press F3 to dismiss it.
Pro tip: Once you’ve built some muscle memory around SWAP and SWAP LIST, you’ll next move on to the START command, which opens a new logical screen in full-screen view and drops you where you want to be in a single step. From there, you’ll likely start reassigning your function keys, like SWAP NEXT/PREV, and eventually write REXX to launch multiple screens automatically. We’ll save all of that for future articles, but it’s worth knowing what’s ahead.
The SWAPBAR Command
The SWAPBAR command is the closest concept of “tabs” for navigation we have in ISPF. It is also relatively new. As you can imagine, if you had to constantly use SWAP LIST to remember which logical screens you had open, it might get a little old after a while.
Thankfully, in 2009, z/OS V1R10 was released, and with it came a new system command: SWAPBAR (IBM Redbook z/OS Version 1 Release 10 Implementation, Page 486.) It allows ISPF users see a list of every active logical screen across the bottom of their screen, and quickly swap (or “tab”) between them.
The SWAPBAR command syntax is:
SWAPBAR [ ON | OFF | / ]
The SWAPBAR command has three options. These are:
- SWAPBAR or SWAPBAR ON – This displays the swap bar on the bottom of the screen with a list of all active screens.
- SWAPBAR OFF: This turns the swap bar display off
- SWAPBAR /: This options the swap bar settings dialog.
When I first logged onto a mainframe in December 2024, the training didn’t cover this. It wasn’t until April 2025—four months in—that I stumbled onto SWAPBAR on my own, while in an ADHD laser-focus session. Now, I tell every “new to Z” person I meet.
The active logical screen will have an * symbol to the left of it, and the alternate logical screen will have a – symbol to the left of it. In both cases, if the name is longer than eight characters (or bytes), the last character will be hidden.
If your system is set up to handle more than eight logical screens, there is a chance you’ll run out of real estate. If this happens, a > symbol will appear to the right of the list signaling you that you can scroll to see more.
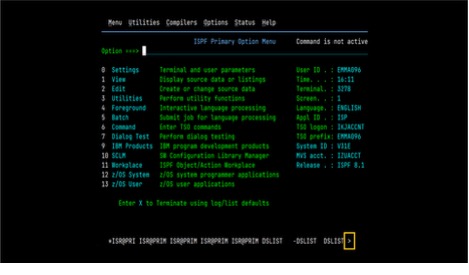
You can scroll a couple of ways. The quickest is by clicking the arrows. You can also position your cursor on the < or > symbols and press Enter, or position your cursor anywhere on the SWAPBAR and use the standard scroll keys, which are the same as elsewhere in ISPF for horizontal scrolling:
- F10 – Scrolls Left
- F11 – Scrolls Right
Likewise, if you have reached the end of the list, you will see a < symbol, signaling that you can scroll back to the left.
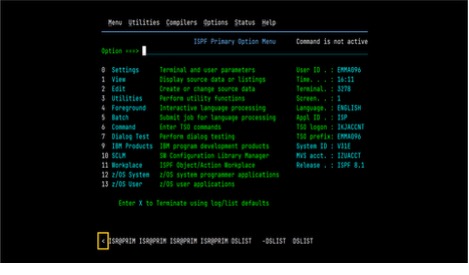
As you may have noticed, there are a lot of funky-looking names showing up in our SWAPBAR, and unless they’re wildly specific (SDSF), you’ll probably end up pulling your hair out—if you haven’t already. Fortunately, we have a remedy for this, with the Screen Name command (see The SCRNAME Command).
The SWAPBAR Settings
The SWAPBAR settings allow you to customize the look of your SWAPBAR by typing SWAPBAR / on the primary command line. This displays the settings panel.
It’s important to note that your settings will only take effect once you’ve dismissed the dialog. Also, they’re saved in your system profile, meaning they will persist. Any changes made to the current logical screens, and not explicitly marked as global, will only apply to the current screen, and will be lost forever should you close that screen.
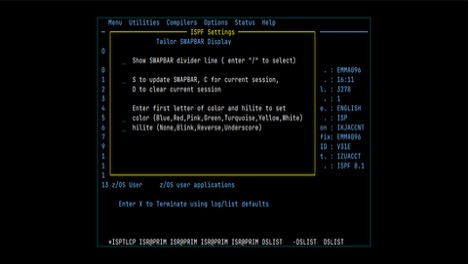
The SWAPBAR Divider
This option will draw a thin line above the SWAPBAR. To activate it, place a / to the left on the turquoise line.
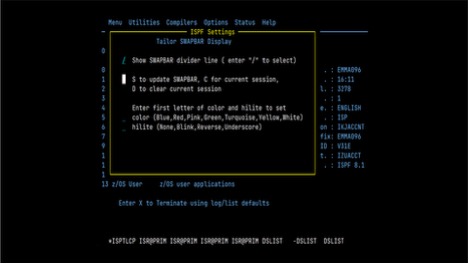
To see the updated setting, press F3 to dismiss the dialog.
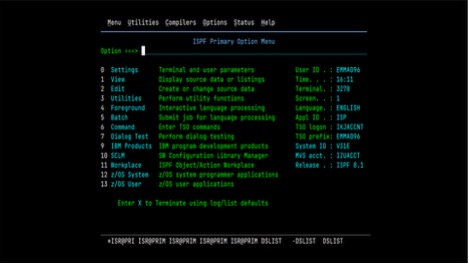
Since the divider line does eat up valuable real estate, it’s an optional customization and ultimately up to you.
The SWARPBAR Options Field
This was a case where I actually found this website more helpful than IBM’s.
- S – Update the for global SWAPBAR configuration forever.
- C – Update for the current session only.
- D – Clear and delete the current customizations.
The SWAPBAR Colors
This option is nicely documented-ish. The first time I tried this, I simply typed the first letter of the color; I chose pink (because why not?), dismissed the dialog and—nothing happened.
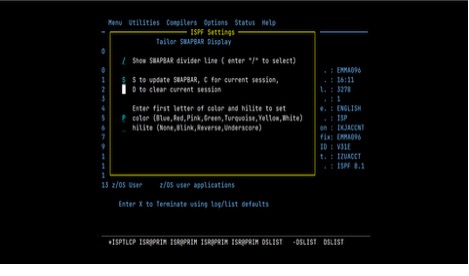
I repeated this process three more times. I finally changed the SWAPBAR Options field to S, dismissed the dialog, and I have a beautiful pink SWAPBAR. It’s little things like this that can frustrate a “new to z” person.
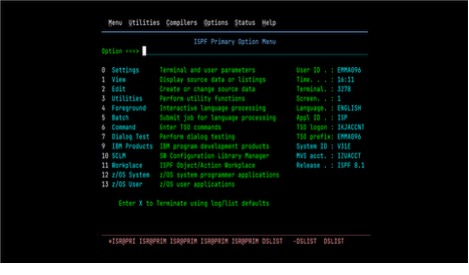
Customizing the Color Per ‘Tab’
Let’s say that you have multiple items in your SWAPBAR, and maybe two of them code, one is data and the fourth is the log. While setting the screen name is helpful, we can add a unique color—per-session, per-item—that helps us quickly identify the “type,” if you will. To do this, bring up the options (SWAPBAR /), and select a color. Then, type C into the SWAPBAR Options field and dismiss the dialog. You’ll see this one item is a different color, and I find this incredibly useful in my workflow.
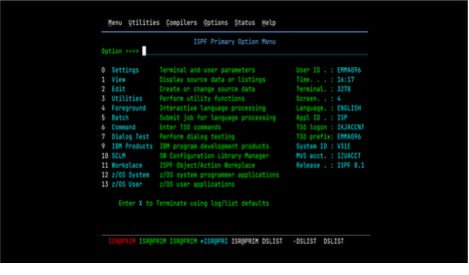
The SCRNAME Command
The SCRNAME (Screen Name) command allows you to customize the names to anything your heart desires—as long as it’s two to eight characters!
The SCRNAME command has four options. These are:
- SCREEN_NAME: A 2 to 8 character name and must start with a letter.
- PERM: This acts like a temporary lock, stopping over commands from automatically changing it until you close that screen.
- ON: Shows the name that you specified in the PANELID area of the screen.
- OFF: Removes the screen name from the visible display.
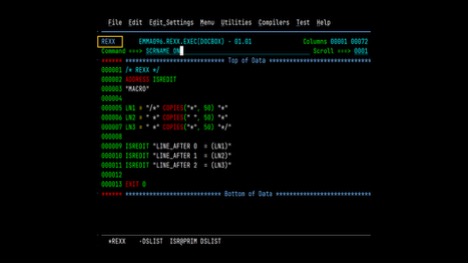
To set the screen name, type the SCRNAME command, followed by a two- to eight-character name on the primary command line, and press Enter. In our example, I’ve named my screen REXX.
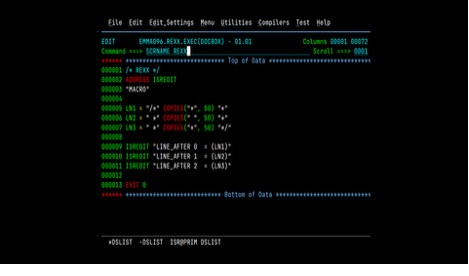
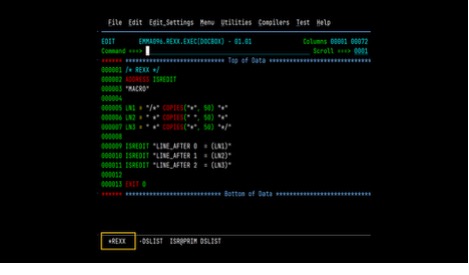
The following screenshot shows the user-defined screen name in the PANELID area.
Splitting Your Screen
The SPLIT command will start a new session and split your screen, separated by a line of dots. This is ISPF’s version of VS Code’s split editor, except it’s only horizontal.
Splitting Your Screen Vertically
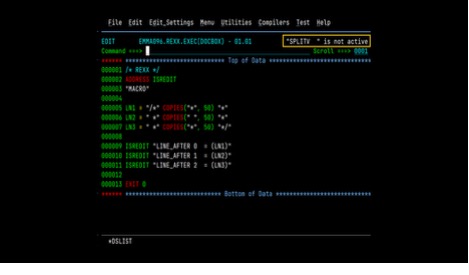
If you have access to a 3290 terminal emulator, there is a command called SPLITV. This lets you split vertically instead. But this is what I’d consider a VERY rare case, and one that most readers won’t run into today. If you were to type this command on a 3270 emulator, you would get: “SPLITV” is not active.
It’s worth noting the author doesn’t use SPLIT. I prefer SWAP and SWAPBAR because I get full logical screens.
In addition to typing the command, your F2 key is typically already mapped to SPLIT as well. If you look at the SPLIT syntax, you’ll notice that there is an optional NEW parameter. To be completely honest, this is the first time I’ve ever looked at the SPLIT syntax, so this is a new discovery for me too.
The SPLIT command has one option. This is:
- NEW: Creates a new logical screen up to the max.
If you use SPLIT by itself, the physical screen will be divided into two vertical screens. Keep in mind this split occurs where your cursor is. This can be a bit confusing at first, because if you press F2, and your cursor happens to be in the primary command line, then it will be split where the primary command line was, making a very small screen.
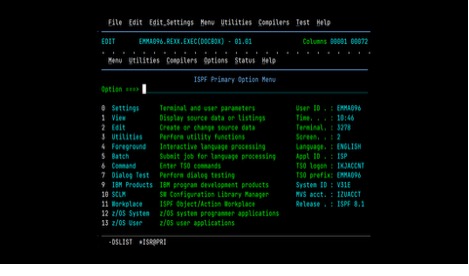
With this in mind, if you’re going to use SPLIT, ensure your cursor is where you want it to be split. You can resize it by repositioning your cursor and press F2 (SPLIT key) again though.
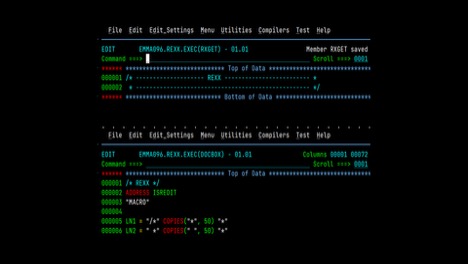
The SPLIT NEW Command
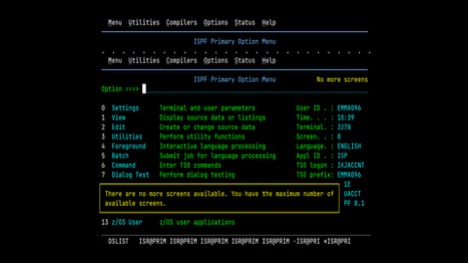
The SPLIT NEW command will add a new logical screen each time, until you reach the maximum numbers of screens. At that point, it will display a message letting you know you cannot add more. It is also important to note that even if you have multiple sessions, only two at a time will be displayed.
Conclusion
In this article you’ve learned how you can have multiple screens like in VS Code. You’ve also learned that there are some restrictions, like ISPF supporting a maximum of 32 logical screens while you can only do eight in VS Code. However, realistically, I’ve never needed more than three to four.
Until next time, may the code be with you.