What’s New in RDi With V9.6
IBM i developers got an early Christmas gift in 2017—a new version of RDi to play with! Here's an overview of some of the changes that we've found so far.
IBM i developers got an early Christmas gift in 2017—a new version of RDi to play with! In case you haven’t had a chance yet to install and check out the new features, here’s an overview of some of the changes that we’ve found so far.
When you first launch RDi V9.6 and open an RPGLE source member, there are some differences you are likely to notice right away. Others are “hidden.” So we’ll look at some of the obvious and the not so obvious features. One point to note is that many of the new features have been “turned on” by default. In case you prefer to go back to the way the earlier releases worked, most of these new options can be controlled via preferences.
Hover Enhancements
After opening an RPGLE source member in V9.6, you’ll notice that as you move your cursor around in the code, you get significantly different hover text appearing. Hover text has been enhanced in many different ways.
First, when you hover over the name of a simple stand alone field in the logic, the hover text shows the definition as it did in V9.5, but the name will be a hyperlink. Clicking on that hyperlink takes you to the definition of the field. This may not seem very exciting because we had hyperlinking support in the editor before, but read on. Hover text now has many new talents.
When you hover over an externally described field, you’ll see not only the hyperlinked name and definition, but also the name of the file(s) and format(s) where that field is defined—including the external qualified name of the file object(s) where the compiler found the definition.
.jpg")
If you hover over a data structure subfield the hover text will include the hyperlinked name of the data structure where the subfield was defined. If it’s in a nested data structure, all the levels of the structure are included. If you hover over a field that was passed as a parameter to the program or procedure, that information is included as well.
So hover text now includes not only the definition of the item but also, where relevant, the context of the definition. Another new talent is inclusion of comments that the editor thinks may be relevant to the definition. How does it decide if the comments are relevant? It picks up any comment lines immediately preceding the item being defined as well as any end of line comments on the definition line itself. Blank lines are ignored in the search for comments to include. Here is an example of the hover text for a procedure that includes comments.
There’s something more you may notice about all this new hover activity. We’re told that on Windows systems, this new hover action often causes a clicking sound effect. We both use Macs and we haven’t noticed any sound effect but we’ve heard that it can get irritating if that is turned on in your Windows settings. You can turn it off with the Windows control panel: Control Panel > Sound – choose the Sounds tab. Find the “Start Navigation” sound effect from the list of Program Events and then choose (None) from the Sounds pulldown list.
Annotation Enhancements
Another feature you’re likely to notice is in the area of annotations, which are used more widely than before. Back in V9.5.1, the ability was introduced to have syntax errors in the editor appear as annotations in the left margin in place of the traditional bright pink error messages inserted as extra lines into the source. However, compile errors were still inserted into the source – unless you had selected the “Insert none” option from the Error List’s view menu, in which case you had no indication of the error at all in the editor.
In this new version, compile errors are also (by default) implemented as annotations in the left margin rather than inserting pink error messages. Hover over the error annotation and you’ll see the error message(s) related to that line of code. We like this new way of showing errors since it takes up less space. The old method also sometimes had problems with positioning if lines of code had been inserted or deleted since the compile was done. However, if you are a fan of the pink error messages and want them back, you can turn off the annotations via the new “message style” option from the view menu on the Error List.
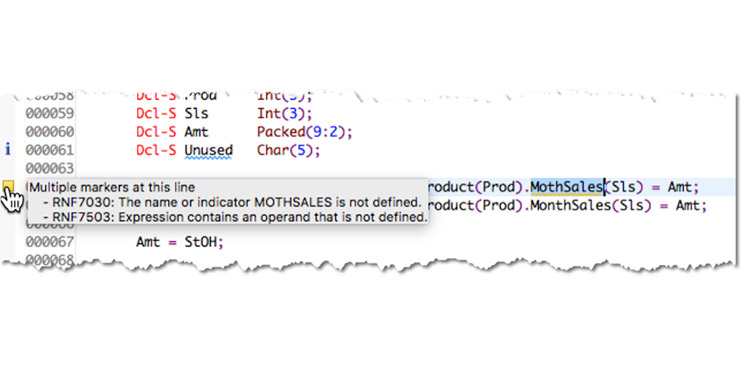
Another annotation enhancement is the new feature to highlight any definitions in the source where the item is not referenced in the source member. These could be data declarations or procedures that are defined but never specifically referenced. That informational annotation looks like a lower case i and hovering over it will show that the item isn’t used. This feature is customizable via the preferences. If you prefer not to see these new annotations, simply turn off the “Annotate unreferenced definitions” preference found on the ILE RPG preference page which is under Remote Systems LPEX Editor > IBM i Parsers.
An example of both the compile error and the unreferenced item annotations is illustrated in the image below.
Compare and Merge
Prior to V9.6, we could select two members in the Remote System Explorer list and choose from the context menu “Compare With > Each Other.” This brought up a detailed side-by-side comparison of the differences between the two members. It was very handy for identifying differences. However, if you wanted to apply changes from one member to the other you needed a separate plug-in, such as the iSphere Compare Editor.
Now when comparing two members, new icons appear that allow you to copy changes from the right member to the left member and vice versa. While there is an option to copy all the changes from one side to the other, many would likely prefer the more controlled approach of selecting changes one at a time and deciding whether to move that change to the other member.
In addition to using the icons for implementing changes, there is also a small connector line in the middle between each set of changes found. Hovering over a connector line brings up two arrows. Clicking on the right-pointing arrow applies the current set of changes from the left member to the right one while changes are applied in the other direction using the left-pointing arrow. The image below illustrates this ability. Note the hover text with the arrows between the sets of changes. The icons highlighted on the right side can also be used to apply changes one at a time or all at once. The type of compare—in this case the IBM i Member Compare—is identified on the left. Read on for the significance of the type.
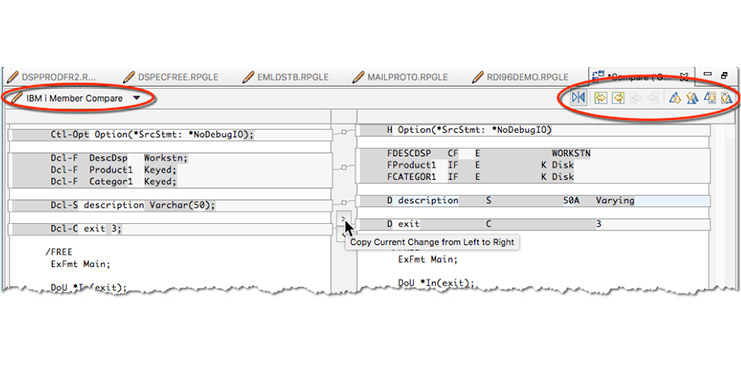
The IBM i Member compare type hides the sequence numbers and change dates from the editor and, more significantly, maintains them for the developer as changes propagated from one source to the other. Text compare, on the other hand, includes the sequence numbers and change dates and doesn’t maintain them as changes are made. When using Text Compare, a warning pops up the first time you make a change to alert you to the fact that you are responsible for maintaining that information. You can switch between Member and Text compare modes by using the arrow next to the compare type name.
New key behaviors
Some of our favorite enhancements in this release are small, yet very nice, new features to use when editing RPG source code. These new features are controlled via a new Preference page for the ILE RPG parser—the Key Behavior page. You may recall that there was previously a section on the main ILE RPG preference page for “Enter key behavior.” That’s where you could specify things such as “Repeat previous specification type” and “Automatic closure of control block.” Those entries have now moved to the new generic Key Behavior page, along with the control for some nice new features.
First is the preference to have the Enter key now do a split line action instead of inserting a new blank line when coding free form RPG. This accomplishes the same thing as the Alt-S shortcut key with a couple of exceptions. First, the new Enter key behavior only splits the line on free format lines of code whereas Alt-S splits any line. Even with this preference set, a new line will be inserted by the Enter key when editing fixed format RPG. Second, the preference to indent the code that was split to the next line that was introduced in an earlier release still only controls the Alt-S shortcut—the Enter key will always indent the code on the split line, regardless of the preference setting for Alt-S split behavior.
The “Split line on Enter” behavior is consistent with the way other language editors typically work. For most of us though, it will take a little time to become accustomed to this new behavior (which is turned on by default in V9.6). But then it took time for many of us moving from SEU to RDi to become accustomed to the previous Enter key behavior. Note that if you accidentally split a line on Enter, you may use Alt-J to join the line back together or, of course, just undo the split action.
The second new preference is the ability to have the tab key indent code to the right of the cursor when coding free form RPG rather than simply moving the cursor. The preference says “tab key inserts spaces for free form source” and is also set on by default. This behavior works slightly differently depending on whether you’re working on a single line of code vs a selected block of code. For a single line, the tab key will indent (or outdent with Shift-Tab) the code to the right of the current cursor position. When a block of code is selected, all the code on any/all lines selected is shifted regardless of the cursor position. This comes in very handy when inserting a new level of nested logic that requires additional indentation for some existing code.
As with the split line on enter preference, this isn’t completely new functionality. We have been selecting code and using the shortcuts Alt-F8 to shift right or Alt-F7 to shift left to accomplish this. But using the tab key is more straightforward and similar to the way other editors behave.
The size of each indentation—i.e., the number of spaces inserted on each tab—is controlled on the Formatter preference page under the ILE RPG parser.
CL command for host-based Code Coverage
The Code Coverage facility was introduced into RDi in V9.1 and enhanced in V9.5. Primarily it’s intended to aid in testing applications to show which lines of code have not been covered by a test run.
Prior to V9.6 it was always initiated from within RDi and the results viewed with RDi. The new feature allows a code coverage session to be initiated on the host via a CL command. In this case, the data collected is stored in a file which is then subsequently accessed for viewing and analysis using RDi. This not only frees up the RDi workbench during the collection of the coverage data, but also makes it easier to automate code coverage testing. RDi is still required to view and analyze the data gathered.
If you want to use this new CL command to initiate your Code Coverage sessions, you will first need to ensure some PTFs are installed on your host system. The PTFs are available for both V7R2 and V7R3 and are listed below.
V7R3: 5770WDS PTFs SI65229 and SI64655
V7R2: 5770WDS PTFs SI65228 and SI64544
The CL command is CODECOV. It has two required parameters:
- A command to run the code being tested (often a CALL command, but it could be a user-created command)
- At least 1 module (from 1 or more programs or service programs) for which you want to gather statistics
Other Goodies and Gotchas
There is a new preference for ILE RPG to categorize named indicators as fields in the Outline view. This is not enabled by default but if you prefer to see them in your Fields list rather than in the Indicators list in Outline, you can turn on that preference.
If you use iProjects, you will find that there are some new shortcuts for doing builds and retrieving errors and you can now associate a connection and library for multiple iProjects at once.
If you use ACS (Access Client Solutions) for Run SQL Scripts or a 5250 emulator, you may be interested in new options added to the context menu for the Objects subsystem in Remote Systems to launch the full ACS interface as well as options to launch directly either Run SQL Scripts, the emulator or the Schemas interface.
Using any of those options will launch the version of ACS you already have installed if it’s recent enough. Otherwise, it will launch the version shipped with RDi, which is currently ACS version 1.1.7.1.
This new version of RDi is based on more recent version (4.6.3) of Eclipse than V9.5. That new base brought with it a few other notable differences. First, by default the open perspectives (listed near the top right of the workbench) do not contain the name of the perspective. This was done to reduce the space required for them. You can bring the text back for your perspectives by right clicking on one of the icons and choosing the “Show Text” option.
The print toolbar button has also been hidden by default. It’s not a feature we ever use, but if you do, you can bring it back. Choose Perspective > Customize perspective… from the Window pulldown menu and expand the File category to find the Print icon.
If you used the version of RDi which included the EGL language, you need to know that there is no EGL version of RDi available for V9.6 – so don’t uninstall your current version!
If you had Data Studio installed with RDi, make sure you install the latest fix pack – to V9.6.0.1 or later – before installing Data Studio.
There are some other new features in V9.6. The ones we have covered above are the ones we found the most interesting. You can view a complete list of new features here.
It is difficult to explain some of these new features in words or even using static images. Check out our blog for more on our experiences with RDi V9.6, including some links to a video to illustrate some of the features that are tough to describe in words.
Jon Paris is a technical editor with IBM Systems Magazine and co-owner of Partner400.
Susan Gantner is a technical editor with IBM Systems Magazine and co-owner of Partner400.