Lend Your Voice to Your Mainframe: An Experiment
In today’s world, voice technology has become very prevalent, and is evolving and maturing at a tremendous pace. From voice shopping on Amazon to routine (and growingly complex) tasks performed by personal voice assistant devices/speakers such as Amazon’s Alexa, voice technology has many practical uses in different spheres of life.
What about lending our voices to our mainframes? That’s possible too. And why would you want to do that? Well, think about this situation: You are driving to work and stuck in a heavy traffic. You will be late to office today. Upon reaching office, you will have to immediately run to a meeting where you will have to present an important report to the team. You won’t have time to generate the report after reaching office.
Voice technology comes to your rescue here. Think about logging into a secured app while on your way to the office and placing your voice instruction to generate the report. The voice instruction submits the necessary job(s) on the mainframe and the report is ready by the time you reach office. This is just an example, but there could be several other use-cases.
Here, I share my experience working on a fun skunkworks proof of concept (POC) experimental project, trying to get some routine tasks done on the mainframe using my voice.
A word of caution: This experimental project can, at best, be implemented to help you execute some very basic, routine tasks on the mainframe. This is, in no way, a production grade implementation—for that matter, it can’t even come close to it—and shouldn’t be treated as one. Complex technical aspects like voice authentication (recognizing only your voice on your system and no one else’s) haven’t been taken into consideration here. A production grade implementation of a similar project should probably also take into consideration some aspects of applied AI/ML, such as natural language processing (NLP) and multi-language support—those aspects haven’t been implemented in this experimental project.
My idea here is to get the initial framework built and ensure that it’s functional—being able to convert one’s voice in a natural language to text (a simple speech-to-text (STT) engine) and analyze the text to extract meaningful keyword/s mapped to a command that gets the relevant task done on the mainframe. I hope this experiment will encourage more experimentation and interesting ideas and prototypes, including enhancements to this project itself, making it more secure, reliable, robust and widely implementable.
Now, we’ll go through the sequence of steps required to complete the project.
NOTE: I worked on this POC project on my local Windows machine and therefore, it’s assumed that readers will try all instructions pertaining to this POC on a system running Microsoft Windows OS.
Step 1: Create an HTML File
You can name the HTML file “STT.html” or select any other name of your choice. Figure 1 below shows the code that the HTML file should include.
<!DOCTYPE html>
<html lang="en">
  <head>
    <meta charset="UTF-8" />
    <meta name="viewport" content="width=device-width, initial-scale=1.0" />
    <meta http-equiv="X-UA-Compatible" content="ie=edge" />
    <title>A simple Speech To Text (STT) Web Application</title>
    <link rel="stylesheet" href="./style.css" />
  </head>
  <body>
    <header>
      <h1>A simple Speech To Text (STT) Web Application</h1>
    </header>
    <main>
      <button id="Button">Click to Speak</button>
      <div id="TextDisplay"></div>
      <p id="SpeechRecognitionNotSupportedByBrowserMessage" hidden aria-hidden="true">
        Sorry!!! Speech Recognition isn't supported by your browser!!!
      </p>
    </main>
    <footer>
      <p>A simple Browser Speech Recognition Web Application built using plain HTML, CSS and JavaScript</p>
    </footer>
    <script src="https://ajax.googleapis.com/ajax/libs/jquery/3.1.0/jquery.min.js"></script>
    <script type="text/javascript">
      var ResultTextSaved = " ";
      window.addEventListener("DOMContentLoaded", () => {
        const Button = document.getElementById("Button");
        const TextDisplay = document.getElementById("TextDisplay");
        const SpeakButtonSpace = document.getElementsByTagName("main")[0];
        const SpeechRecognition = window.SpeechRecognition || window.webkitSpeechRecognition
        if (typeof SpeechRecognition === "undefined") {
          Button.remove();
          const SpeechRecognitionNotSupportedByBrowserMessage = document.getElementById("SpeechRecognitionNotSupportedByBrowserMessage");
          SpeechRecognitionNotSupportedByBrowserMessage.removeAttribute("hidden");
          SpeechRecognitionNotSupportedByBrowserMessage.setAttribute("aria-hidden", "false");
        } else {
          let Listening = false;
          const VoiceRecognition = new SpeechRecognition();
          const StartListeningToTheUserVoice = () => {
            VoiceRecognition.start();
            Button.textContent = "Click to stop listening to the user voice";
            SpeakButtonSpace.classList.add("speaking");
          };
          const StopListeningToTheUserVoice = () => {
            VoiceRecognition.stop();
            Button.textContent = "Click to start listening to the user voice";
            SpeakButtonSpace.classList.remove("speaking");
          };
          const DisplayTheText = event => {
            TextDisplay.innerHTML = "";
            for (const TextTranscript of event.results) {
              var ResultText = document.createTextNode(TextTranscript[0].transcript);
              const ResultTextDisplayArea = document.createElement("p");
              if (TextTranscript.isFinal) {
                ResultTextDisplayArea.classList.add("final");
              }
              ResultTextDisplayArea.appendChild(ResultText);
              TextDisplay.appendChild(ResultTextDisplayArea);

              ResultTextSaved = document.getElementsByClassName("final");
              ResultTextSavedFinal = ResultTextSaved[0].innerHTML;
              ResultTextSavedFinalAllSpacesStrippedOut = ResultTextSavedFinal.replaceAll(" ", "");

              // Voice Task# 01: Start a TN3270 Application Session.
              TN3270WordExistsOrNot = ResultTextSavedFinalAllSpacesStrippedOut.indexOf("tn3270");
              if(TN3270WordExistsOrNot >= 0) {
                console.log("Entry into the StartTN3270ApplicationSession Endpoint!!!");
                $.ajax({
                  type:"POST",
                  url: 'http://127.0.0.1:5739/StartTN3270ApplicationSession',
                });
                console.log("Exit from the StartTN3270ApplicationSession Endpoint!!!");
              }

              // Voice Task# 02: List all the Jobs owned by my User ID.
              JobWordExistsOrNot = ResultTextSavedFinalAllSpacesStrippedOut.indexOf("job");
              if(JobWordExistsOrNot >= 0) {
                console.log("Entry into the ListAllJobsOwnedByMyUserID Endpoint!!!");
                $.ajax({
                  type:"POST",
                  url: 'http://127.0.0.1:5739/ListAllJobsOwnedByMyUserID',
                });
                console.log("Exit from the ListAllJobsOwnedByMyUserID Endpoint!!!");
              }

              // Default Action
              if((JobWordExistsOrNot < 0) && (TN3270WordExistsOrNot < 0)) {
                console.log("Sorry!!! No relevant command could be figured out!!! Try saying something else!!!");
              }

            }
          };
          VoiceRecognition.continuous = true;
          VoiceRecognition.interimResults = true;
          VoiceRecognition.addEventListener("result", DisplayTheText);

          Button.addEventListener("click", () => {
            Listening ? StopListeningToTheUserVoice() : StartListeningToTheUserVoice();
            Listening = !Listening;
          });
        }
      });
    </script>
  </body>
</html>
Figure 1. HTML File Content
Step 2: Create A CSS File
Name the CSS file “style.css” and if you choose to use a different name, remember that you need to edit the following line (present in the HTML <head> element) in your HTML file.
<link rel=”stylesheet” href=”./style.css” />
You need to replace style.css by the new name that you have chosen to use. Figure 2 below shows the code that the CSS file should include.
* {
  box-sizing: border-box;
}
html,
body {
  min-height: 100vh;
  margin: 0;
  padding: 0;
}
body {
  font-family: Helvetica, Arial, sans-serif;
  color: #2e0886;
  display: flex;
  flex-direction: column;
  padding-left: 1em;
  padding-right: 1em;
}
h1 {
  text-align: center;
  font-weight: 100;
}
header {
  border-bottom: 1px solid #f32c09;
  margin-bottom: 2em;
}
main {
  flex-grow: 2;
  justify-content: space-around;
  align-items: center;
  background-color: rgb(240, 235, 241);
  border-radius: 12px;
  margin-bottom: 2em;
  padding-top: 4em;
  text-align: center;
}
@keyframes bg-pulse {
  0% {
    background-color: #fff;
  }

  50% {
    background-color: #c7ecee;
  }

  100% {
    background-color: rgb(255, 255, 255);
  }
}
main.speaking {
  animation: bg-pulse 1.5s alternate ease-in-out infinite;
}
#result {
  color: #666;
  font-style: italic;
  text-align: center;
}
#result .final {
  color: #ab0dca;
  font-style: normal;
}
button {
  font-size: 18px;
  font-weight: 200;
  padding: 1em;
  width: 200px;
  background: transparent;
  border: 4px solid #0831e9;
  border-radius: 4px;
  transition: all 0.4s ease 0s;
  cursor: pointer;
  color: #275ae4;
  margin-bottom: 4em;
}
button:hover,
button:focus {
  background: #c2ecb5;
  color: rgb(5, 6, 82);
}

a {
  color: #d60ff0;
}
.error {
  color: #f22f46;
  text-align: center;
}
footer {
  border-top: 1px solid #0c0e81;
  text-align: center;
}
Figure 2. CSS File Content
Step 3. Create A Python Script
You can name the Python file “STT.py” or select any other name. Figure 3 below shows the code that the python file should include.
#!flask/bin/python

from flask import Flask
import subprocess

STTProjectApp = Flask(__name__)

@STTProjectApp.route("/", methods=['GET'])
def DefaultEndpoint():
    print(" ")
    print(" ")
    print("Default Endpoint!!!")
    return "Default Endpoint!!!"

@STTProjectApp.route("/StartTN3270ApplicationSession", methods=['POST'])
def StartTN3270ApplicationSession():
    print(" ")
    print(" ")
    print(" ")
    print(" ")
    print("StartTN3270ApplicationSession Endpoint!!!")
    subprocess.call([r'C:UsersUser1DesktopLend-Your-Voice-To-Your-MainframeVistaTN3270-Automated-Login-Script-IMSA.bat'])
    return "StartTN3270ApplicationSession Endpoint!!!"

@STTProjectApp.route("/ListAllJobsOwnedByMyUserID", methods=['POST'])
def ListAllJobsOwnedByMyUserID():
    print(" ")
    print(" ")
    print(" ")
    print(" ")
    print("ListAllJobsOwnedByMyUserID Endpoint!!!")
    subprocess.call([r'C:UsersUser1DesktopLend-Your-Voice-To-Your-MainframeList-All-Jobs-Owned-By-My-UserID.bat'])
    return "ListAllJobsOwnedByMyUserID Endpoint!!!"

if __name__ == "__main__":
    STTProjectApp.run("0.0.0.0", "5739")
Figure 3. Python File Content
Note: Create a new directory and for convenience, store the HTML, CSS, and Python files in it. In my case, I created a directory named “Lend-Your-Voice-To-Your-Mainframe” in my desktop.
Step 4. Employing The Speech Recognition Component/Interface Of The Web Speech API
One of the components of this project is a simple browser-based STT web application that uses the speech recognition component/interface of the Web Speech API. The web browser sends the user’s audio to Google’s servers to perform speech-to-text conversion. Since the speech recognition component/interface makes use of server-side API, an internet connection is needed.
I’ve also found out that the speech recognition functionality is not supported by all browsers. I’ve tested with four standard browsers: Firefox, Internet Explorer, Google Chrome and Microsoft Edge. The functionality isn’t supported by Firefox and Internet Explorer; only Google Chrome and Microsoft Edge provide the required support. And this finding is as of March 2022; things could change in the future. Figure 4 below shows that the web application displays the message, “Sorry!!! Speech Recognition isn’t supported by your browser!!!” when opened using Firefox.
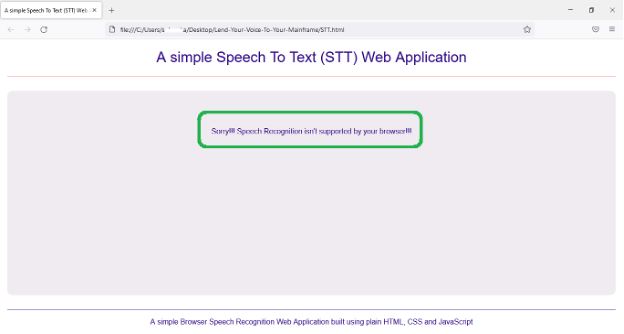
The “Sorry!!! Speech Recognition isn’t supported by your browser!!!” message is a result of the following pieces of code snippets present in the HTML file.
    <main>
      <button id="Button">Click to Speak</button>
      <div id="TextDisplay"></div>
      <p id="SpeechRecognitionNotSupportedByBrowserMessage" hidden aria-hidden="true">
        Sorry!!! Speech Recognition isn't supported by your browser!!!
      </p>
    </main>

        if (typeof SpeechRecognition === "undefined") {
          Button.remove();
          const SpeechRecognitionNotSupportedByBrowserMessage = document.getElementById("SpeechRecognitionNotSupportedByBrowserMessage");
          SpeechRecognitionNotSupportedByBrowserMessage.removeAttribute("hidden");
          SpeechRecognitionNotSupportedByBrowserMessage.setAttribute("aria-hidden", "false");
        } else {
Figure 5. Code snippets in the HTML file that causes the message, “Sorry!!! Speech Recognition isn’t supported by your browser!!!” to show up when the web application is opened using Firefox, which doesn’t support the speech recognition functionality
Note: Code inspiration credit for a part of my web application: Speech to text in the browser with the Web Speech API by Phil Nash
Step 5: A Brief Explanation of the Python Script
The Python script uses Flask to host a simple web server on your local Windows machine to serve Python to a webpage. We’ve configured three endpoints (also called paths or routes), namely: / (the default endpoint), /StartTN3270ApplicationSession and /ListAllJobsOwnedByMyUserID. The endpoints are like pages of a website. Each endpoint defines how the page can be accessed as well as the function or method which will execute whenever the endpoint is called.
For instance, the /StartTN3270ApplicationSession endpoint defines the function StartTN3270ApplicationSession(). POST is the only way specified for the endpoint definition (methods=[‘POST’]), so the endpoint will deny any other HTTP requests (such as GET) made to it. The endpoint name and the name of the function defined by the endpoint need not be the same. In our script, we use the same names for convenience.
When a POST HTTP request is made to the /StartTN3270ApplicationSession endpoint from our browser-based STT web application, the endpoint executes a Windows batch script ‘VistaTN3270-Automated-Login-Script-IMSA.bat’ that will start a TN3270 application session automatically. And a POST HTTP request made to the /ListAllJobsOwnedByMyUserID endpoint will result in the execution of the batch script ‘List-All-Jobs-Owned-By-My-UserID.bat,’ which will fetch the list of all the jobs owned by your User ID from the mainframe. The origination of the POST HTTP requests made to the endpoints from our browser-based STT web application is controlled through your voice, completing routine tasks on the mainframe.
Note: In this POC project, I have demonstrated two tasks: starting a TN3270 application session and fetching the list of all the jobs owned by my User ID from the mainframe. Then, getting more tasks done on the mainframe is simply a matter of adding the relevant endpoint definitions in the Python script.
Finally, run (“0.0.0.0”, “5739”), denote the IP address of your local Windows machine where your server is running, and port. The IP address 0.0.0.0 tells Flask to serve files on your local IP address; in our case, http://127.0.0.1:5739/
Step 6: A Closer Look At The HTML File Code
Figure 6 below depicts the code in the HTML file specific to our two tasks, namely: starting a TN3270 application session and fetching the list of all the jobs owned by your User ID from the mainframe.
    <script type="text/javascript">
      var ResultTextSaved = " ";
      window.addEventListener("DOMContentLoaded", () => {

              ResultTextSaved = document.getElementsByClassName("final");
              ResultTextSavedFinal = ResultTextSaved[0].innerHTML;
              ResultTextSavedFinalAllSpacesStrippedOut = ResultTextSavedFinal.replaceAll(" ", "");

              // Voice Task# 01: Start a TN3270 Application Session.
              TN3270WordExistsOrNot = ResultTextSavedFinalAllSpacesStrippedOut.indexOf("tn3270");
              if(TN3270WordExistsOrNot >= 0) {
                console.log("Entry into the StartTN3270ApplicationSession Endpoint!!!");
                $.ajax({
                  type:"POST",
                  url: 'http://127.0.0.1:5739/StartTN3270ApplicationSession',
                });
                console.log("Exit from the StartTN3270ApplicationSession Endpoint!!!");
              }

              // Voice Task# 02: List all the Jobs owned by my User ID.
              JobWordExistsOrNot = ResultTextSavedFinalAllSpacesStrippedOut.indexOf("job");
              if(JobWordExistsOrNot >= 0) {
                console.log("Entry into the ListAllJobsOwnedByMyUserID Endpoint!!!");
                $.ajax({
                  type:"POST",
                  url: 'http://127.0.0.1:5739/ListAllJobsOwnedByMyUserID',
                });
                console.log("Exit from the ListAllJobsOwnedByMyUserID Endpoint!!!");
              }

              // Default Action
              if((JobWordExistsOrNot < 0) && (TN3270WordExistsOrNot < 0)) {
                console.log("Sorry!!! No relevant command could be figured out!!! Try saying something else!!!");
              }
Figure 6. Code in the HTML file specific to our two tasks
The transcribed text is stripped of all spaces. There are two separate sections in the code, each corresponding to one of our two tasks. Each section of the code looks for a specific keyword in the transcribed text and in case the keyword exists, a POST HTTP request is made to the corresponding endpoint. For instance, the existence of the keyword “tn3270” in the transcribed text results in a POST HTTP request to the /StartTN3270ApplicationSession endpoint. There is a third default action section which prints the message, “Sorry!!! No relevant command could be figured out!!! Try saying something else!!!” to the browser console when no intended keywords exist in the transcribed text.
Note: As you plan to add more tasks, a separate section pertaining to each task can be added to the code and—depending on the choice of the keyword/s for a specific task and its/their existence in the transcribed text—a POST HTTP request can be made to the corresponding endpoint. The “if statement condition” test of the default action section will also need to be populated with new conditions of the new keywords not existing in the transcribed text.
Step 7: Create A Windows Batch Script (.bat) File That Starts A TN3270 Application Session
In my POC project, the batch script file is named “VistaTN3270-Automated-Login-Script-IMSA.bat” and placed in the same folder (“Lend-Your-Voice-To-Your-Mainframe” in my POC project) where the HTML, CSS and Python files also exist. You could change the batch script file name; however, remember that if you decide to change the name of the batch script file, the new file name should also reflect in the Python script.
@STTProjectApp.route("/StartTN3270ApplicationSession", methods=['POST'])
def StartTN3270ApplicationSession():
    print(" ")
    print(" ")
    print(" ")
    print(" ")
    print("StartTN3270ApplicationSession Endpoint!!!")
    subprocess.call([r'C:UserssubsarkaDesktopLend-Your-Voice-To-Your-MainframeVistaTN3270-Automated-Login-Script-IMSA.bat'])
    return "StartTN3270ApplicationSession Endpoint!!!"
Figure 7. Should you wish to change the name of the batch script file, remember to plug the new name into the Python script.
NOTE: Don’t forget to change the path to the batch script file in the Python script code!
To understand what goes into the batch script file, read my article “Automate Your TSO Logons With Vista TN3270 Application Macros and a Windows Batch (.bat) File.”
Step 8: Create A Second Windows Batch Script (.bat) File That Fetches A List Of All The Jobs Owned By Your User ID
In my POC project, the batch script file is named “List-All-Jobs-Owned-By-My-UserID.bat” and placed in the same folder (“Lend-Your-Voice-To-Your-Mainframe”’ in my POC project) where the HTML, CSS, Python, and the other batch script files also exist. You could change the name of the second batch script file; however, the name change requires the new file name to also reflect in the Python script.
@STTProjectApp.route("/ListAllJobsOwnedByMyUserID", methods=['POST'])
def ListAllJobsOwnedByMyUserID():
    print(" ")
    print(" ")
    print(" ")
    print(" ")
    print("ListAllJobsOwnedByMyUserID Endpoint!!!")
    subprocess.call([r'C:UserssubsarkaDesktopLend-Your-Voice-To-Your-MainframeList-All-Jobs-Owned-By-My-UserID.bat'])
    return "ListAllJobsOwnedByMyUserID Endpoint!!!"
Figure 8. A name change to the second batch script file requires the new file name to also reflect in the Python script.
NOTE: Don’t forget to change the path to the batch script file in the Python script code!
The code that makes up the second batch script file is very simple, comprising of only the following two lines:
       SETLOCAL ENABLEDELAYEDEXPANSION
       zowe zos-jobs list jobs
The Zowe zos-jobs CLI command is invoked to fetch a list of all the jobs owned by your User ID. Read more about Zowe here.
Our setup is ready. Now, we’ll be able to get some simple tasks done on the mainframe using our voice. I’ve also created a step-by-step demo of this process—you can view the recording here.