Creating Bootable AIX OVA Images
A new command is included with Technology Level 5 for AIX 7.2 allowing for a utility which will enable admins to capture a bootable OVA image of their AIX systems rootvg. Learn how in this tutorial.
A new command is included with Technology Level 5 for AIX 7.2 which will allow AIX administrators to create an Open Virtual Appliance (OVA) package. This utility will enable admins to capture a bootable OVA image of their AIX systems rootvg. This OVA package can then either be imported into PowerVC for automated VM deployment or imported into the IBM Cloud for VM deployment with IBM’s Power Virtual Server (PowerVS) capability.
According to the full announcement:
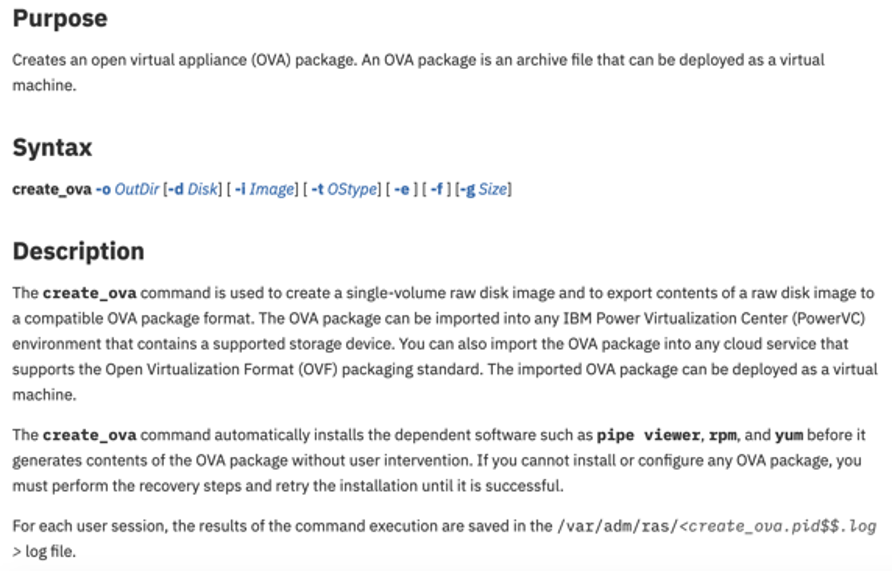
“AIX adds a new command: create_ova. This new command creates an open virtual appliance (OVA) package. An OVA package is an archive file that can be deployed as a virtual machine. The create_ova command is used to create a single-volume raw disk image and to export contents of a raw disk image to a compatible OVA package format. The OVA package can be imported into any IBM Power Virtualization Center (PowerVC) environment that contains a supported storage device. You can also import the OVA package into any cloud service that supports the Open Virtualization Format (OVF) packaging standard. The imported OVA package can be deployed as a virtual machine.”
For more information on the create_ova command, see Figure 1.
Let me walk you through an example and discuss my experience using this new tool.
Creating an OVA Package on AIX 7.2
Once your AIX system has been updated to AIX 7200-05 or higher, you’ll now have access to the new create_ova command (script).
root@aix / # oslevel -s
7200-05-00-0000
root@aix / # which create_ova
/usr/sbin/create_ova
root@aix / # ls -ltr /usr/sbin/create_ova
lrwxrwxrwx    1 root     system           25 Sep 30 20:38 /usr/sbin/create_ova -> /usr/lib/instl/create_ova
root@aix / # ls -ltr /usr/lib/instl/create_ova
-r-xr-x---    1 root     system        13312 Aug 07 10:38 /usr/lib/instl/create_ova
root@aix / # lslpp -w /usr/lib/instl/create_ova
  File                                        Fileset               Type
  ----------------------------------------------------------------------------
  /usr/lib/instl/create_ova                   bos.rte.install       File
root@aix / # create_ova
Usage create_ova: Creates a consummable (single) disk image for PowerVC import activity.
create_ova -o <output directory> [-d <target disk>] [-i <image src file>]
        [-t <os_type>] [-e] [-f]
-o      Specifies output directory for ova asset.
-d      Specifies logical disk target for image restoration/copy.
-i      Specifies an image source file of type: mksysb or raw disk.
-t      Specifies os-type of image source file. Supported types: aix|rhel|sles
-e      Copy volume data of disk target (excludes image restoration).
-f      Ignore filesystem space warnings.
The create_ova tool requires the pipe viewer (pv) tool to be installed in order to function. If the tool is not installed, the first time you run create_ova, it will attempt to “yum install” it for you. If you don’t have access to a yum repos (either locally or via the internet), you could grab this tool and install it upfront.
“The create_ova command automatically installs the dependent software such as pipe viewer, rpm, and yum before it generates contents of the OVA package without user intervention. If you cannot install or configure any OVA package, you must perform the recovery steps and retry the installation until it is successful.”
root@aix / # rpm -qa pv
pv-1.6.6-1.ppc
Pay attention to the storage requirements for create_ova, it requires a fair bit of spare storage to perform its work.
“Note: When you export the contents of the mksysb image or the contents of a raw disk image, the create_ova command stores the entire content of the volume in the raw disk image. The create_ova command needs enough space to make copies of the volume in the raw disk image and up to 10% extra space for metadata. For example, if the volume in the raw disk image needs 100 GB space, the create_ova command needs an additional 10 GB space (total of 110 GB space). When you use the -f flag, ensure that the output directory on the destination server has enough space for the exported content.”
Verify that you meet all of the “Image Requirements,” particularly ensuring that cloud-init is already installed in your existing AIX VM (see Figure 2).

In my testing I chose to try the following example, from the documentation page (seen in Figure 3):

On my test system, I had one spare disk for the alternate rootvg, hdisk2. I had previously created a mksysb image, AIX72-mksysb. The /data file system was setup as a “work space” for the create_ova processes.
root@aix /data # lspv
hdisk1          00f94f5594dfc757                    rootvg          active
hdisk2          00f94f559ec54b56                    None

root@aix /data # create_ova -o /data -d hdisk2 -i /cg/AIX72-mksysb -t aix
Initializing resources ...


Checking for resource group MKSYSB...Checking /tmp space requirement...done
x ./bosinst.data
Checking hdisk2 space requirement...done
Executing command:
alt_disk_mksysb -B -c /dev/vty0 -d hdisk2 -m /cg/AIX72-mksysb
Restoring /image.data from mksysb image.
Checking disk sizes.
Creating cloned rootvg volume group and associated logical volumes.
Creating logical volume alt_hd5.
Creating logical volume alt_hd6.
Creating logical volume alt_hd8.
Creating logical volume alt_hd4.
Creating logical volume alt_hd2.
Creating logical volume alt_hd9var.
Creating logical volume alt_hd3.
Creating logical volume alt_hd1.
Creating logical volume alt_hd10opt.
Creating logical volume alt_hd11admin.
Creating logical volume alt_lg_dumplv.
Creating logical volume alt_livedump.
Creating logical volume alt_cglv.
Creating logical volume alt_repo00.
Creating /alt_inst/ file system.
Creating /alt_inst/admin file system.
Creating /alt_inst/cg file system.
Creating /alt_inst/home file system.
Creating /alt_inst/opt file system.
Creating /alt_inst/tmp file system.
Creating /alt_inst/usr file system.
Creating /alt_inst/usr/sys/inst.images file system.
Creating /alt_inst/var file system.
Creating /alt_inst/var/adm/ras/livedump file system.
Restoring mksysb image to alternate disk(s).
Linking to 64bit kernel.
Changing logical volume names in volume group descriptor area.
Fixing LV control blocks...
forced unmount of /alt_inst/var/adm/ras/livedump
forced unmount of /alt_inst/var/adm/ras/livedump
forced unmount of /alt_inst/var
forced unmount of /alt_inst/var
forced unmount of /alt_inst/usr/sys/inst.images
forced unmount of /alt_inst/usr/sys/inst.images
forced unmount of /alt_inst/usr
forced unmount of /alt_inst/usr
forced unmount of /alt_inst/tmp
forced unmount of /alt_inst/tmp
forced unmount of /alt_inst/opt
forced unmount of /alt_inst/opt
forced unmount of /alt_inst/home
forced unmount of /alt_inst/home
forced unmount of /alt_inst/cg
forced unmount of /alt_inst/cg
forced unmount of /alt_inst/admin
forced unmount of /alt_inst/admin
forced unmount of /alt_inst
forced unmount of /alt_inst
Fixing file system superblocks...

Checking for resource group PIPEVIEWER...already installed.
Checking /data space requirement...done

Checking for resource group aix_20201007210902.img...
2048020.0GiB 0:08:02 [42.4MiB/s] [42.4MiB/s] [=======================================================================================================================>] 100%       0    +
 records in
20480+0 records out
41943040+0 records in
41943040+0 records out
done

Checking for resource group aix_20201007210902.ova.gz...
Checking /data space requirement...done
a ./aix_20201007210902.ovf 4 blocks
a ./aix_20201007210902.img 41943040 blocks
20.0GiB 0:11:11 [30.5MiB/s] [30.5MiB/s] [=======================================================================================================================>] 100%

Done verifying resources.
root@aix /data #
This successfully created a bootable OVA package of my AIX rootvg.
root@aix /data # ls -ltr
total 2366920
drwxr-xr-x    2 root     system          256 Sep 30 21:51 lost+found
-rw-r--r--    1 root     system   1211826585 Oct 01 00:03 aix_20201007210902.ova.gz
For the above to work, I needed a mksysb image in a file system somewhere, a spare disk large enough to clone rootvg and enough free file system space for the image file, the OVA file and free space for the gzip operation i.e. 20GB disk for alt_rootvg, 2-3GB for the mksysb image, approximately 60GB for the image file “work space.” For a total of (around) 85GB of storage required for a 20GB image, that compresses down to a little over 1.2GB.
During the create_ova process, an image file (.img) is created first. This “raw disk image” appears to be a simple “dd” of a hdisk device to a file i.e. dd if=/dev/hdisk2 bs=1m of=/data/aix_20201007210902.img. Then an ovf (image spec file) is generated and finally the OVA tar archive is built from the .ovf and .img files. Below is an extract of verbose (set -x) output from the create_ova script, showing an example the print_ovf and tar operations.
...
+ print_ovf -t aix -n aix_vm -f aix_20201007210902.img -o aix_20201007210902.ovf -c 0
...
+ tar -chvf - ./aix_20201007210902.ovf ./aix_20201007210902.img

The resulting OVA package is compressed with gzip.


root@aix /data #
</ovf:Envelope>
  </ovf:VirtualSystemCollection>
    <ovf:Name>AIX_VM</ovf:Name>
    <ovf:Info></ovf:Info>
    </ovf:VirtualSystem>
      </ovf:VirtualHardwareSection>
        </ovf:Item>
          <ns1:boot xmlns:ns1="ibmpvc">True</ns1:boot>
          <rasd:ResourceType>17</rasd:ResourceType>
          <rasd:InstanceID>1</rasd:InstanceID>
          <rasd:HostResource>ovf:/disk/disk1</rasd:HostResource>
          <rasd:ElementName>AIX_VM</rasd:ElementName>
          <rasd:Description>Temporary image asset</rasd:Description>
        <ovf:Item>
        <ovf:Info>Storage resources</ovf:Info>
      <ovf:VirtualHardwareSection>
      </ovf:OperatingSystemSection>
        <ns0:architecture xmlns:ns0="ibmpvc">ppc64</ns0:architecture>
        <ovf:Description>aix</ovf:Description>
        <ovf:Info/>
      <ovf:OperatingSystemSection ovf:id="9">
      </ovf:ProductSection>
        <ovf:Product/>
        <ovf:Info/>
      <ovf:ProductSection>
      <ovf:Info>aix_OS Image Product Export</ovf:Info>
      <ovf:Name>AIX_VM</ovf:Name>
    <ovf:VirtualSystem ovf:id="vs0">
  <ovf:VirtualSystemCollection>
  </ovf:DiskSection>
        <ovf:Disk capacity="21474836480" capacityAllocationUnits="byte" diskId="disk1" fileRef="file1"/>
    <ovf:Info>Disk Section</ovf:Info>
  <ovf:DiskSection>
  </ovf:References>
        <ovf:File href="aix_20201007210902.img" id="file1" size="21474836480"/>
  <ovf:References>
<ovf:Envelope xmlns:rasd="http://schemas.dmtf.org/wbem/wscim/1/cim-schema/2/CIM_ResourceAllocationSettingData" xmlns:xsi="http://www.w3.org/2001/XMLSchema-instance" xmlns:ovf="http://schemas.dmtf.org/ovf/envelope/1">
<?xml version="1.0" encoding="UTF-8"?>
cat aix_20201007210902.ovfroot@aix /data #

aix_20201007210902.ova.gz-rw-r--r--    1 root     system     31948800 Oct 07 21:20
-r--r--r--    1 root     system         1651 Oct 07 21:19 aix_20201007210902.ovf
-rw-r--r--    1 root     system   21474836480 Oct 07 21:19 aix_20201007210902.img
drwxr-xr-x    2 root     system          256 Sep 30 21:51 lost+found
total 42005536
root@aix /data # ls -ltr
So, it would be possible to create your own OVF file using the print_ovf utility, if you had a raw disk image already created (i.e. a .img file created with dd).
root@aix /data # /usr/lib/instl/print_ovf

Usage print_ovf: Prints an OVF metafile based on (single) disk asset.


print_ovf -f <file> -o <ovf_name> -t <os_type> [-n <instance_name>]


-f    Specifies filename of raw disk image source.

-o    Specifies output filename for OVF metadata.

-t    Specifies os-type of raw image file. Supported types: aix|rhel|sles

e.g.

root@aix /data # /usr/lib/instl/print_ovf -t aix -n aix_vm -f aix_20201007210902.img -o my.ovf -c 0
After the successful creation of my bootable OVA package I could either use this to import into PowerVC or IBM Cloud (PowerVS). Let’s look at each of these examples next.
root@aix /data # ls -ltr
total 2762088
drwxr-xr-x    2 root     system          256 Sep 30 21:51 lost+found
-rw-r--r--    1 root     system   1414149493 Oct 07 21:32 aix_20201007210902.ova.gz
Importing an AIX OVA Package Into PowerVC
To import the OVA into PowerVC, the very first thing I needed to do was copy the OVA package over to my PowerVC (v1.4.4.1) server. I simply scp’ed the OVA file over.
[root@cgpvc ~]# pwd
/root
[root@cgpvc ~]# ls -ltr aix*ova*
-rw-r--r--. 1 root root 1412888271 Oct  6 20:47 aix_20201007210902.ova.gz
For easier identification, I renamed the OVA package filename to aix725.ova.gz and then used the “powervc-image” utility to import the OVA image into the PowerVC image library.
[root@cgpvc ~]# powervc-image import -p /root/aix725.ova.gz -t 9c774d59-12e0-4c23-9d7f-889c051059d3
Created temporary staging directory /var/opt/ibm/powervc/imgstaging/tmpMKThp7
Compressed archive detected.
Extract package contents to temporary directory.
Parsing the OVF descriptor.
Register temporary file-copy volume driver.
Registered temporary driver PVC-Lite-File_tmpMKThp7 servicing location /var/opt/ibm/powervc/imgstaging/tmpMKThp7
Begin processing image volume 'AIX_VM'.
Create temporary copy-source volume for staging file 'aix_20201007210902.img'....Done creating.
Migrate volume data for 'AIX_VM' from 'File-system' to the target storage template 'V7000 base template'.
The size to copy is 20.00 GiB.
Creating and attaching target volume..

Copying aix_20201007210902.img [30%] Rate: 184.26 MiB-per-S, ETA: 0:01:17 [H:MM:SS]
Detaching volume and finalizing metadata...
Copy complete after waiting 0:01:49 [H:MM:SS]

GiBs remaining to copy for image: 0
Creating image resource 'aix_20201007210902'.
/usr/bin/powervc-volume-image-import --name "aix_20201007210902" --os-distro aix --endianness big --boot-set e5fdee6e-3cad-4131-8fee-888defd42304
No handlers could be found for logger "nova.monkey_patch"
Created new image with ID 842f90c3-d22e-4369-bc6c-806d866dda6d.
De-register the temporary file driver 'PVC-Lite-File_tmpMKThp7'.
Cleaning up the temporary staging directory...
Time spent: 0:16:20 [H:MM:SS]
Successfully created new image 'aix_20201007210902' with ID '842f90c3-d22e-4369-bc6c-806d866dda6d'.
[root@cgpvc ~]#
The image was imported successfully.
You can read more about importing and exporting images with PowerVC here. I recommend you use the “test-conn” option with the powervc-image tool before you attempt to import an image into PowerVC. If the test completes successfully then you should have no issues importing your image. If it fails, then you must resolve the issue(s) before you can import or export an image.
[root@cgpvc ~]# powervc-image test-conn --add-zoning 9c774d59-12e0-4c23-9d7f-889c051059d3
 Running 'cleanup' flow for any stale SCSI devices before connection activity...
 +------------------+-----------------------+------------+-------+------------------+--------+---------+
 | wwnn             | time_since_last_reset | port_state | host  | wwpn             | speed  | targets |
 +------------------+-----------------------+------------+-------+------------------+--------+---------+
 | c0507607a17f0640 | [unknown]             | Online     | host4 | c0508608a17f0640 | 8 Gbit | 2 (*)   |
 +------------------+-----------------------+------------+-------+------------------+--------+---------+
     +---------+-----------+------------------+----------+
     | row_num | target_id | target_wwpn      | num_luns |
     +---------+-----------+------------------+----------+
     | 1       | 0         | 500508780240afd4 | 1        |
     | 2       | 1         | 500508780240afd3 | 1        |
     +---------+-----------+------------------+----------+
 +------------------+-----------------------+------------+-------+------------------+--------+---------+
 | wwnn             | time_since_last_reset | port_state | host  | wwpn             | speed  | targets |
 +------------------+-----------------------+------------+-------+------------------+--------+---------+
 | c0507607a17f063e | [unknown]             | Online     | host3 | c0508608a17f063e | 8 Gbit | 2 (*)   |
 +------------------+-----------------------+------------+-------+------------------+--------+---------+
     +---------+-----------+------------------+----------+
     | row_num | target_id | target_wwpn      | num_luns |
     +---------+-----------+------------------+----------+
     | 1       | 0         | 500508680210afd4 | 1        |
     | 2       | 1         | 500508680210afd3 | 1        |
     +---------+-----------+------------------+----------+
 +------------------+-----------------------+------------+-------+------------------+--------+---------+
 | wwnn             | time_since_last_reset | port_state | host  | wwpn             | speed  | targets |
 +------------------+-----------------------+------------+-------+------------------+--------+---------+
 | c0507607a17f063c | [unknown]             | Online     | host2 | c0508608a17f063c | 8 Gbit | 2 (*)   |
 +------------------+-----------------------+------------+-------+------------------+--------+---------+
     +---------+-----------+------------------+----------+
     | row_num | target_id | target_wwpn      | num_luns |
     +---------+-----------+------------------+----------+
     | 1       | 0         | 500508680230afd4 | 1        |
     | 2       | 1         | 500508680230afd3| 1        |
     +---------+-----------+------------------+----------+
 +------------------+-----------------------+------------+-------+------------------+--------+---------+
 | wwnn             | time_since_last_reset | port_state | host  | wwpn             | speed  | targets |
 +------------------+-----------------------+------------+-------+------------------+--------+---------+
 | c0507607a17f063a | [unknown]             | Online     | host1 | c0508608a17f063a | 8 Gbit | 2 (*)   |
 +------------------+-----------------------+------------+-------+------------------+--------+---------+
     +---------+-----------+------------------+----------+
     | row_num | target_id | target_wwpn      | num_luns |
     +---------+-----------+------------------+----------+
     | 1       | 0         | 500507680210afd6 | 1        |
     | 2       | 1         | 500507680210afd7 | 1        |
     +---------+-----------+------------------+----------+
 The storage template with ID 9c774d59-12e0-4c23-9d7f-889c051059d3 has the supported Fibre Channel provider 'V7000'.
 Creating a test volume 'image-agility-priming-vol-1c774d' on storage provider 'V7000'...
 ..Done creating.
 Mapping test volume on the storage provider to the local server's ports...
 There are already attached devices from one or more of the mapped target WWPNs: set(['500508680210afd7', '500508680210afd6', '500508680240afd6', '500508880240afd4', '500508680220afd6', '500508680220afd7', '500508680230afd7', '500508680230afd4'])
Device attachment information returned: {'path': u'/dev/disk/by-path/fc-0x500508680210afd6-lun-1', 'scsi_wwn': u'360050868028103ee980000000000137b', 'type': 'block'}

 Connection of test volume worked on initial try.
 Disconnecting test volume 'image-agility-priming-vol-1c774d' from local server since it was created during this run and there was no connection failure...
 Unmapping the test volume from the storage provider...
 Deleting test volume...
 Test Fibre Channel connectivity complete.
 [root@cgpvc ~]#
The most important point here is that PowerVC server must have its (own) storage connected via FC (NPIV) (i.e. from the same storage provider that PowerVC is managing). If it is not then the test-conn check will return an error:
# powervc-image test-conn --add-zoning 0e880b42-9155-42b9-bd9b-e9ad2f2b67b6
Error: Subcommand only supports Fibre Channel storage and this node has no FC adapters reporting.
Command failed.
And, if you attempt to import an image, when the PowerVC server is not connected via FC storage, you’ll see an error similar to this:
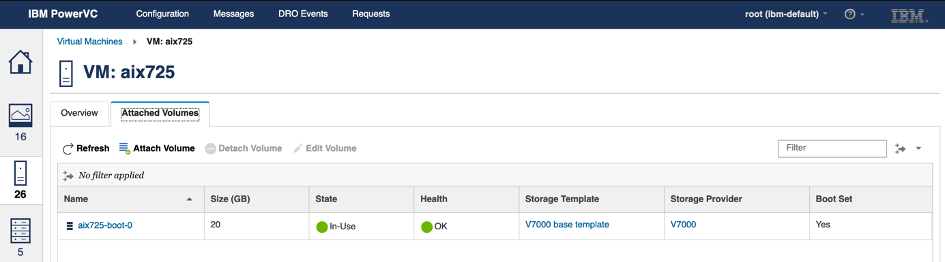
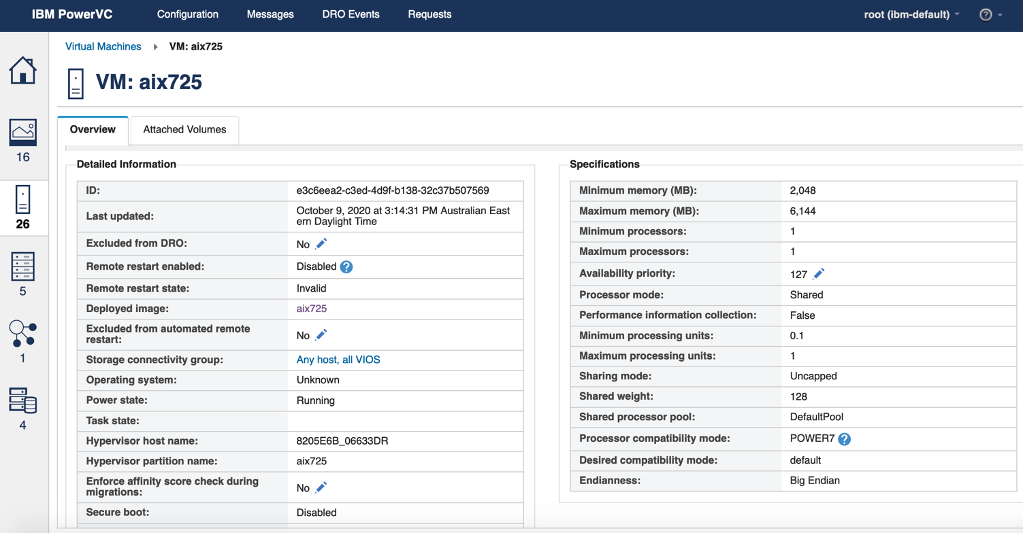
[19017] Warning: Fibre Channel provider 'v7k' is not supported because no FC HBA is detected on this node.During the import of the image into PowerVC, I saw the following activity from the PowerVC UI (see Figures 4-9).
Creation of the volume(s) required for the image creation.


Successful import and creation of a new AIX image in PowerVC library. This image can be used for VM deployment.
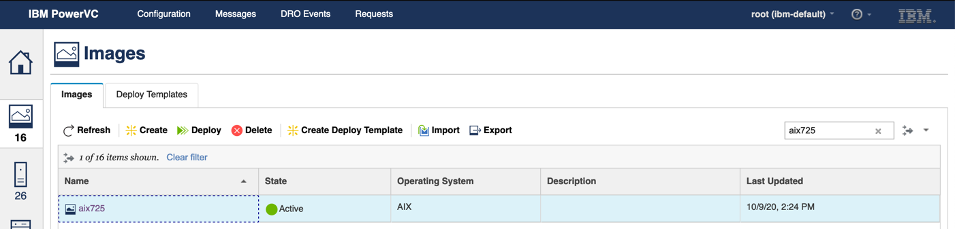

I was able to successfully deploy a VM using the new, imported AIX image.
Importing an AIX OVA Package Into IBM Cloud PowerVS
The OVA package I created came from my lab, so, basically, my on-premise AIX server. In order for me to import my (on-premise) AIX OVA package into the IBM Cloud, I first needed to copy the image into the cloud, somehow. To do this, I decided to use the IBM Cloud Object Storage (COS) service. I scp’ed the OVA file over to my Linux jump box, and then used the s3cmd command to upload the OVA file to IBM COS. I renamed the OVA package to aix725.ova.gz before transferring it to COS.
cgibson@linux : ~ $ s3cmd put aix725.ova.gz s3://cgbucket/
upload: 'aix_20201007210902.ova.gz' -> 's3://cgbucket/aix725.ova.gz'  [part 1 of 78, 15MB] [1 of 1]
 15728640 of 15728640   100% in    4s     3.17 MB/s  done
...
upload: 'aix_20201007210902.ova.gz' -> 's3://cgbucket/aix725.ova.gz'  [part 78 of 78, 704KB] [1 of 1]
 721305 of 721305   100% in    0s  1040.02 KB/s  done

 cgibson@linux : ~ $ s3cmd la
 2020-10-05 03:33   1211826585  s3://cgbucket/ aix725.ova.gz
For more information on how to setup and use IBM COS, please refer the following links:
- https://cloud.ibm.com/docs/cloud-object-storage?topic=cloud-object-storage-getting-started-cloud-object-storage
- https://cloud.ibm.com/docs/power-iaas?topic=power-iaas-backup-strategies#backup-aix
Once the OVA file was uploaded to IBM COS, I followed the steps here, to import the image into my PowerVS “boot image” catalog:
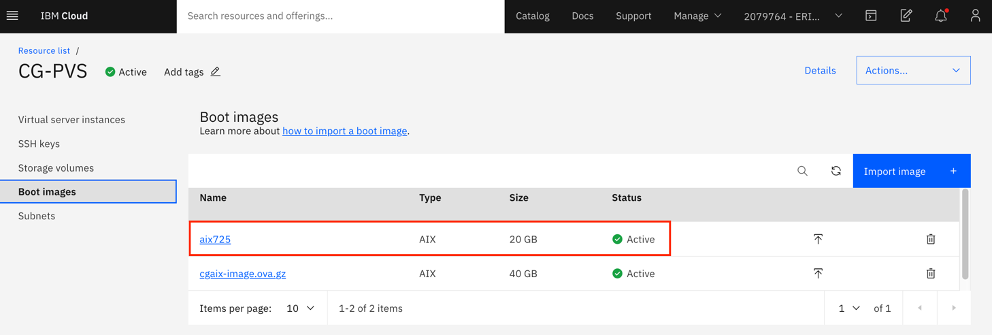
$ ibmcloud pi image-import aix725 --image-path s3.eu-de.cloud-object-storage.appdomain.cloud/cgbucket/aix725.ova.gz --os-type aix --access-key xxxxxxxxxxxxxxxxxxxxxxxxxxxxxxxx --secret-key xxxxxxxxxxxxxxxxxxxxxxxxxxxxxxxxxxxxxxxxxxxxxxxxThe image appeared in my “Boot images” list (see Figure 10).
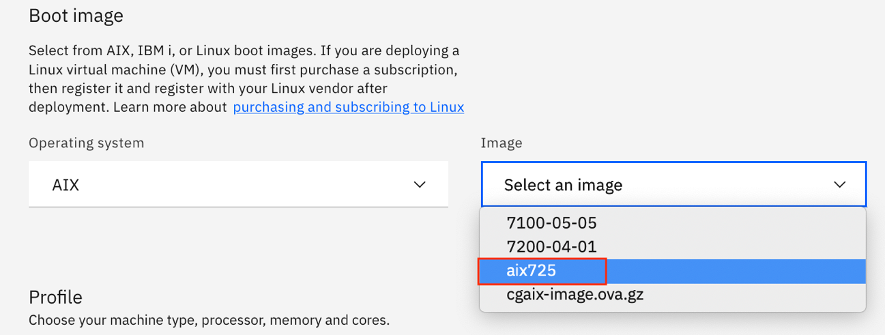
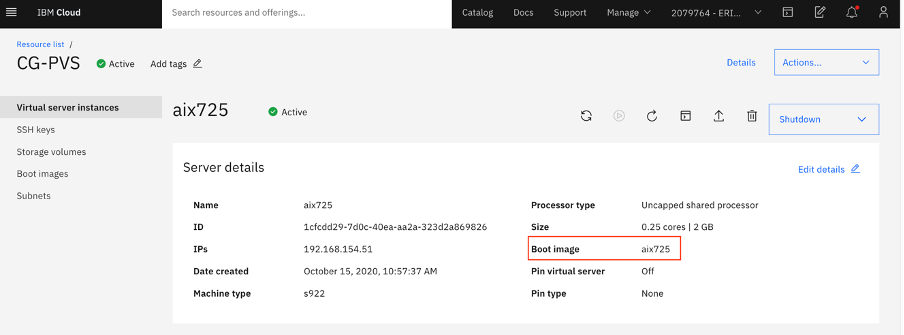
I was then able to deploy a new Virtual server instance using my new boot image (see Figure 11-12).
Potential and Known Issues
Issue 1: VM fails to boot
After you deploy a VM using your new image (in PowerVC or PowerVS) you may find that the VM fails to boot. You may see an error similar to this (below) on the console:
------------------------------------------------------------------------------
                                Welcome to AIX.
                   boot image timestamp: 23:22:06 09/16/2020
                 The current time and date: 23:30:55 09/16/2020
        processor count: 1;  memory size: 4096MB;  kernel size: 45422126
         boot device: /vdevice/v-scsi@30000002/disk@8300000000000000:2

007DA000 bytes of free memory remain at address 02026000


Error: the boot image is corrupted or truncated.
Use alternative media or recovery procedures.

EXIT called ok
0 >
If you capture AIX debug boot output (boot -s verbose from open firmware or “BOOT_FROM_SEQ -s verbose” on POWER9), you may see the following “dd” error message from the bosboot command:
exec(/usr/bin/dd,ibs=1b,obs=64b,of=/dev/hd5){2359760,2425244}
exec(/usr/bin/cat,/tmp/bosboot_2425244_18804/dd.out){2359762,2425244}
dd: write error: No such device or address
65563+1 records in
1024+1 records out
exec(/usr/bin/dspmsg,-s,150,bosboot.cat,48,n0301-161 %s: dd failed to copy %s.n,bosboot,bootimage){2359764,2425244}
0301-161 bosboot: dd failed to copy bootimage.
exec(/usr/bin/dspmsg,-s,150,bosboot.cat,100,n0301-165 %s: WARNING! %s failed - do not attempt to boot device.n,bosboot,bosboot){2359766,2425244}

0301-165 bosboot: WARNING! bosboot failed - do not attempt to boot device.
The VM will stop booting at LED code 0c61 (failed to create the boot image). The root cause of this issue is related to a known “behaviour” on AIX and the number of installed devices.pci.xxxx.rte filesets (170+). There are two workarounds available:
a) Increase the size of the AIX boot logical volume, hd5, from 1 to 2 PPs
or
b) Replace the pre-defined AIX chrp boot image with the “bosboot -a -b…” command
Note: You may also experience this issue when using this alt_disk_mksysb procedure
Issue 2: Error running create_ova script
During testing we uncovered a bug in the create_ova script which prevented the script from working successfully.
dd: /data/aix_m308/7/20M02.img: No such file or directory
The aix_m308/7/20M02.img dd resource was not created successfully.
If you encounter this error, please edit the create_ova script and change the _STAMP line to the following:
_STAMP=$( date +”%Y%m%d%H%M%S”)This issue has been reported to AIX development (Defect SW508362) and a fix is in plan.
Learn More
For more information on everything we’ve discussed above, please refer to the following links:
- What’s new in AIX 7.2 November 2020
- create_ova Command
- Exporting and importing images via the CLI: a deep dive
- Using your own mksysb image to create virtual system instances
All information in this article is provided to you “as is” and represents the views of the authors. TechChannel cannot guarantee or imply absolute reliability, serviceability or function of the information herein.