How to Set Up the Robot Framework for Test Automation
In this step-by-step tutorial, BMC Software’s Sujit Neb explains how to set up the Robot Framework for testing with a simple example
In the fast-paced world of software development, maintaining high quality and reliability while reducing time to market is a significant challenge. Test automation addresses this challenge by enabling repetitive and comprehensive testing processes, ensuring that software products meet the required standards consistently. Among the numerous test automation frameworks available, the Robot Framework stands out due to its simplicity, versatility and extensibility. Here, I’ll demonstrate how to set up the Robot Framework.
What Is the Robot Framework?
The Robot Framework, created by Nokia and now an open-source project, is keyword-driven, making it user-friendly for both technical and non-technical users. It supports various test libraries, enabling seamless integration with numerous tools and technologies. This framework is particularly advantageous for acceptance testing and robotic process automation (RPA).
How Does the Robot Framework Work?
Robot Framework is a generic application- and technology-independent framework. It has a highly modular architecture illustrated in the diagram below in Figure 1.
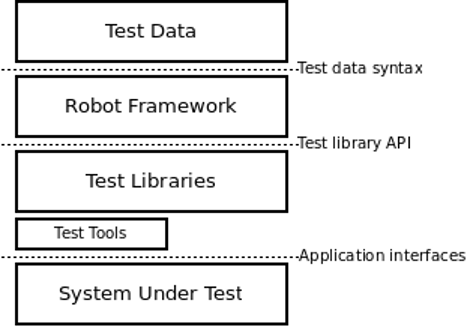
The test data is in simple, easy-to-edit tabular format. When Robot Framework is started, it processes the data, executes test cases and generates logs and reports. The core framework does not know anything about the target under test, and the interaction with it is handled by libraries. Libraries can either use application interfaces directly or use lower-level test tools as drivers.
Robot Framework data is defined in different sections, listed below as in Figure 2.
| Section | Used for |
| Settings | 1) Importing test libraries, resource files and variable files. 2) Defining metadata for test suites and test cases. |
| Variables | Defining variables that can be used elsewhere in the test data. |
| Test Cases | Creating test cases from available keywords. |
| Tasks | Creating tasks using available keywords. Single file can only contain either tests or tasks. |
| Keywords | Creating user keywords from existing lower-level keywords |
| Comments | Additional comments or data. Ignored by Robot Framework. |
Different sections are recognized by their header row. The recommended header format is *** Settings ***, but the header is not case-sensitive, surrounding spaces are optional and the number of asterisk characters can vary if there is at least one asterisk in the beginning. For example, *settings would also be recognized as a section header.
How to Set Up the Robot Framework
Setting up the Robot Framework involves several steps, including installing the framework itself, configuring the environment, and integrating with additional libraries and tools to extend its functionality. This guide provides a comprehensive overview of these steps, offering insights into best practices and tips for effectively utilizing the Robot Framework in different testing scenarios.
To get started, you must have Python and Robot Frameworkinstalled on your machine. For this example, assume we’re installing and setting this up on a Windows machine.
Step 1: Install Python
- Download and run the Python installer.
- Select option Add Python 3.X to PATH.
- Optional: Install to a subfolder on root of your drive (e.g., C:\Python3.X).
- Open a command line by pressing Windows key + R.
- Type cmd and press Enter.
- Type ‘python –version’ and press Enter.
- You will be able to see the installed Python version as shown in Figure 3.

Step 2: Install Robot Framework
There are two options to install Robot Framework. First is to install it globally and second is to install it in a virtual environment. We will install globally, meaning it can be used by any user.
- Open your command prompt on Windows machine.
- Type command – ‘pip install robotframework’ as shown in Figure 4.

- Type command – ‘robot –version’. You should see something like in Figure 5.

Step 3: Set up your IDE
Now let’s set up and install an IDE and its extensions for code completion and debugging. Several IDEs and code editors support the development of Robot Framework tests. The support ranges from simple code highlighting and code completion to test execution and debugging.
Install Visual Studio Code
We will use Visual Studio Code, a lightweight, open-source code editor developed by Microsoft, in this tutorial. It provides extensions for a lot of different languages and technologies. See the VS Code setup guide for more information.
Popular extensions for Robot Framework:
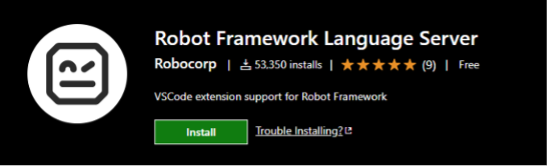
We will install and use Robot Framework Language Server as in Figure 6. It is a Visual Studio Code extension for Robot Framework.
How to install Visual Studio Code:
- Open Visual Studio Code.
- Click on Extensions icon or press Ctrl + Shift + X.
- Search for Robot Framework Language Server and click on it.
- Click on Install.
Step 4: Create Your First Robot Test Case
Here, we’ll consider a simple example that has two test cases. My Test will log a message to console (report) and call a keyword—My Keyword. After that it logs a message to console. Whereas, Another Test will compare two strings, one from variable section and other from a test case itself. If they are equal, then that will log a message to console.
Let’s use different sections from Figure 2 to create the first robot file.
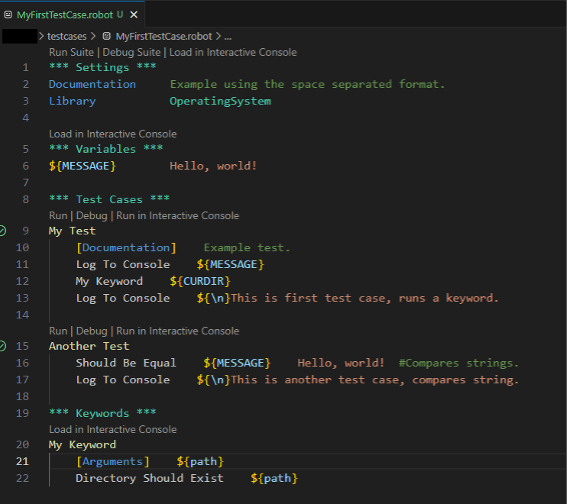
Note: It is an error to have both tests and tasks in the same file. Hence, we are using only test cases section as shown above.
Run your code from VS Code using play button on top right side of your IDE as in Figure 8.

Now, we will run this test case to see the output, as in Figure 9.
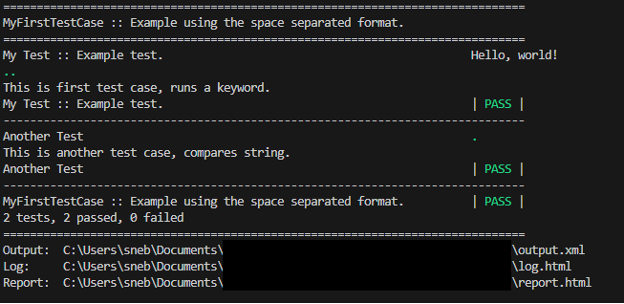
There were two tests executed and two passed. None failed.
Earlier test case has produced three output files: output.xml, log.html and report.html. Let’s dive deep to verify them in detail.
Output Files
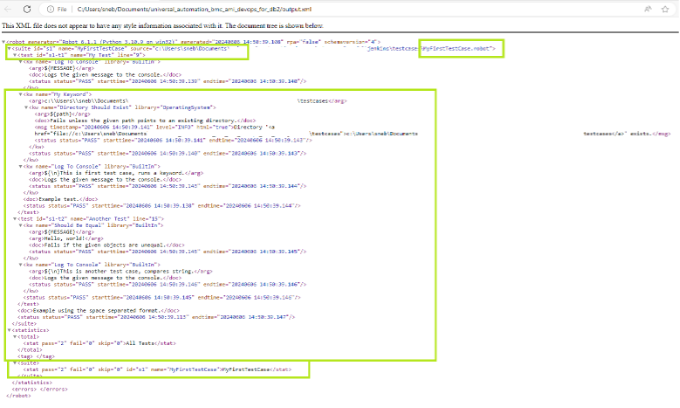
It contains all the test execution results in machine readable XML format as in Figure 10.
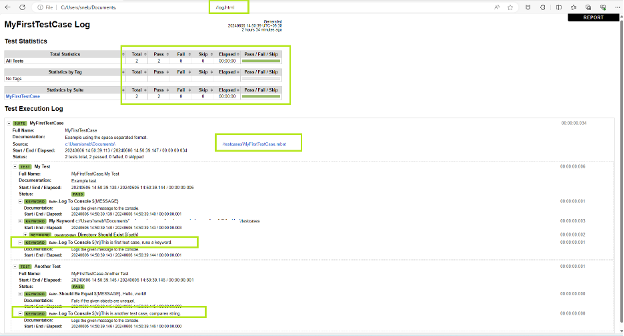
Log File
It contains details about the executed test cases in HTML format as in Figure 11. They have a hierarchical structure showing test suite, test case and keyword details. Log files are needed nearly every time test results need to be investigated in detail. Even though log files also have statistics, reports are better for getting a high-level overview.
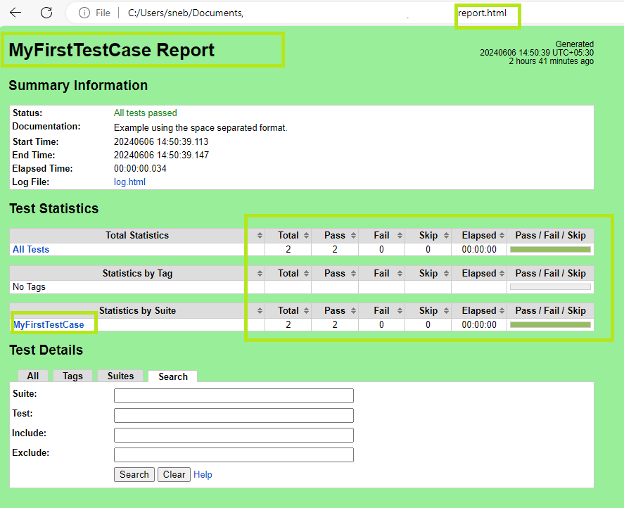
Report File
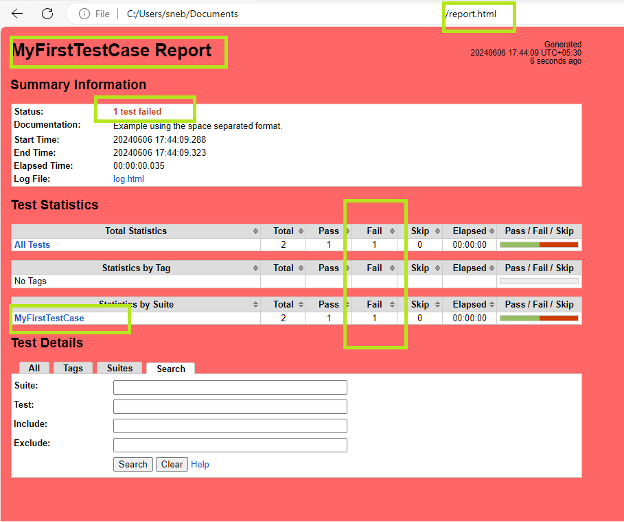
Report files contain an overview of the test execution results in HTML format as in Figure 12. They have statistics based on tags and executed test suites, as well as a list of all executed test cases. When both reports and logs are generated, the report has links to the log file for easy navigation to more detailed information. It is easy to see the overall test execution status from the report, because its background color is green if all tests pass, and bright red if any test fails. The background may also be yellow, which means that all tests were skipped.
An example report file of failed test execution can be seen in Figure 13.
When combined with Selenium WebDriver, a popular and robust tool for browser automation, the Robot Framework becomes an exceptionally powerful tool for web application testing. Selenium WebDriver allows for direct interaction with web browsers, simulating user actions and verifying application behavior across different browsers and platforms. Integrating Selenium with the Robot Framework facilitates the creation of readable and maintainable test scripts, enhancing the overall testing process.
Applications of the Robot Framework
The Robot Framework is a versatile and powerful test automation framework that can be applied in various testing scenarios across different domains. Here are some key and popular applications of the Robot Framework:
Web Application Testing
Robot Framework can be integrated with Selenium WebDriver to automate web browser interactions, enabling comprehensive testing of web applications. It can handle tasks such as form submission, link clicking and page navigation. This can be used to run automated tests across multiple browsers (e.g., Chrome, Firefox, Safari), ensuring compatibility and consistent behavior of web applications.
API Testing
Robot Framework works with supporting libraries like RequestsLibrary for RESTful API testing and SudsLibrary for SOAP API testing. It can be used to send HTTP requests, validate responses and verify the behavior of web services.
Desktop Application Testing
Windows applications can be tested using libraries like WhiteLibrary. Robot Framework can automate Windows desktop application testing by interacting with UI elements such as buttons, menus and text fields.
Robotic Process Automation (RPA)
Robot Framework can be used to automate repetitive business processes such as data entry, report generation and data migration, enhancing operational efficiency. Robot Framework can work alongside RPA tools like UiPath and Blue Prism to create more flexible and powerful automation solutions.
Cloud Testing
Robot Framework can be used to automate testing for applications hosted on cloud platforms like AWS, Azure and Google Cloud, ensuring they function correctly in cloud environments. Robot Framework can be integrated into continuous integration and continuous deployment (CI/CD) pipelines, enabling automated testing as part of the software development lifecycle.
The list is not comprehensive, and the Robot Framework can be extended to different domains and application types.
I have shared a very basic setup to get your mainframe automation journey started. I believe that the ease and flexibility of the Robot Framework, combined with its extensive library ecosystem, make it suitable for a wide range of testing and automation tasks, providing significant value across different stages of the software development lifecycle.