Test Automation: Containerizing the Robot Framework with Docker
In this step-by-step tutorial, BMC Software’s Sujit Neb explains how to containerize the Robot Framework for testing with a simple example

In the modern software development landscape, the demand for high-quality, reliable software products has increased the adoption of automated testing tools like the Robot Framework, an open-source test automation framework. However, managing test environments and dependencies can pose challenges such as version compatibility issue, missing dependent libraries, missing runtime, etc., particularly in large-scale and distributed development settings.
That’s where Docker, a leading containerization platform, comes in. Docker provides lightweight, portable and self-sufficient containers that encapsulate application code along with its dependencies. By leveraging Docker to containerize the Robot Framework, teams can achieve consistent and reproducible test environments, regardless of the underlying infrastructure. This integration streamlines the test setup process, facilitates seamless collaboration among development and QA teams and enhances the scalability of test execution.
This article covers the steps to create and configure Docker containers for the Robot Framework, and the advantages of this approach. Through this exploration, I’ll demonstrate how containerizing the Robot Framework with Docker can significantly enhance the efficiency and reliability of test automation in modern software development practices.
The following steps outline the process to get Robot Framework tests running within Docker containers—and explain how to dispose of the container after the test execution is completed.
To achieve this, we need to install a Docker and create the Robot Framework Docker image. Let’s install the Docker first.
Step 1: Docker Installation
If you want to build Docker images and run containers on your local machine, you need to install Docker. You can find the installation instructions for your operating system on the Docker website.
In this example, we will consider installing Docker Desktop on Linux system.
Install Docker on Linux
Docker Desktop for Linux provides a user-friendly graphical interface that simplifies the management of containers and services. It includes Docker Engine, as this is the core technology that powers Docker containers. Find more information here.
Make sure you follow the instructions for the server installation as given in the manual.
Step 2: Create a Robot Framework Docker Image
Once you have a Docker installed on your system, you are now ready to create your Docker image.
What are Docker images and Docker containers?
A container image is a lightweight, standalone, executable package of software that includes everything needed to run an application: code, runtime, system tools, system libraries and settings.
A container is a standard unit of software that packages up code and all its dependencies.
Now, you need to create a Docker image that can run your tests using the Robot Framework. You can choose from various base images, like one of the official Python images. Base images are already built and available in either Docker Hub or a container registry. You need to choose what best suites your purpose. Here, we are using python:3 as a base image from Docker Hub.
This base image already contains Python and pip, so you can install robotframework and other libraries using pip easily. Note that there are different tags for different Python versions and operating systems.
Create and verify contents for your Dockerfile highlighted as in below Figure 1:
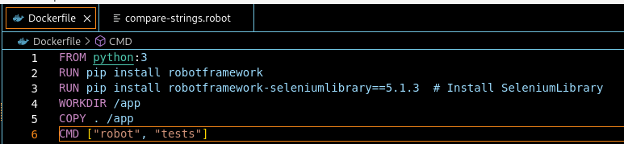
Note, this is the simplest example of the dockerfile and the robotframework.
When you use a Dockerfile to create your image, it may fail due to limits sets on Docker pull. So, if you are not able to pull Docker image, then you might need to log into the container registry that you want to use to pull/push images. In this example, I am using docker.io to pull base image and the build a new one that includes my source code.
Figure 2 shows how the ‘docker login’ works:

Docker login may not be always required. However, it is recommended to ensure you have access to container registry beforehand.
Once you are logged in to container registry, it is time to build the Docker image using the Docker build command. Here, we are using the docker.io container registry to pull docker images for Python.
The command to be used is: docker build -t rf-container-img.
Figure 3 shows the step-by-step process while the Docker image is built.
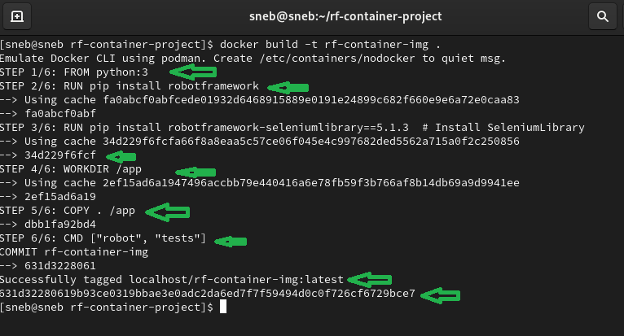
It is always recommended to tag your images to avoid any possible conflicts. After the image name, the optional tag is a custom, human-readable manifest identifier that’s typically a specific version or variant of an image. The tag must be valid ASCII and can contain lowercase and uppercase letters, digits, underscores, periods and hyphens. It can’t start with a period or hyphen and must be no longer than 128 characters. If you don’t specify a tag, the command uses “latest” by default.
Following is the example of tagging your image. Here, “latest” is the tag.
Successfully tagged localhost/my-robotframework-dockerimage:latest
With ‘docker images’ command, you can list your newly created image on your system, as in Figure 4:

Verify that the image is available in the list and tagged per your instructions, then you can work on adding tests.
Step 3: Create Your Test Project
Create your project in Visual Studio Code, so that you can add your code and files to it. You can use any IDE of your choice to write code and add files.
Let’s create a working directory that will include Robot Framework tests, etc., as in Figure 5:
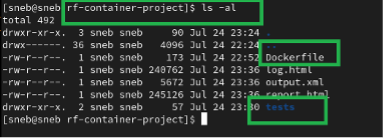
Find the tests robot files created as in Figure 6:
Test 1
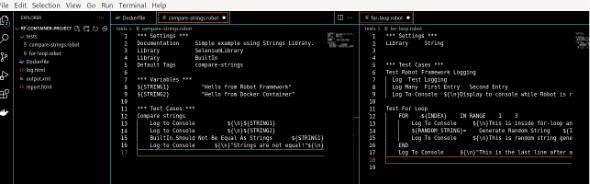
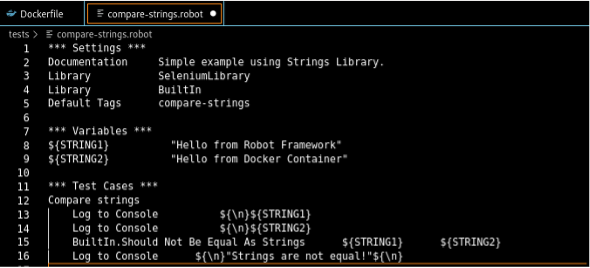
Compare-strings.robot as in Figure 7:
Figure 7: Contents of a compare-string.robot file.
Test 2
Test for-loop.robot as in Figure 8:
Step 4: Run Your Container Using the Docker Image
To run your container, you must run a Docker command called ‘docker run.’ This command will take several arguments as an input while creating your container. We will use a basic set of arguments as given in following the ‘docker run’ command to run our container using the Docker image we built in the previous step.
When you run the container, mount the folder containing your tests into the container.
To mount the folder, use the -v option. Let’s assume the folder is located at /home/user/rf-container-project/ on your local machine. That way, you can easily run your tests in a container and have the results stored on your local machine. Use the run command as in Figure 9.
docker run -it –rm -v /home/sneb/rf-container-project:/app:Z –name=rf-container rf-container-img:latest

The Docker run command creates a container using the parameters and the image provided. In this example, we have used images that were created in step 2. As soon as you execute the docker run command, it starts running a command that is supposed to be run once container starts. In our case, it will run all tests from the directory app/tests.
The result of the docker run command will look like Figure 10:
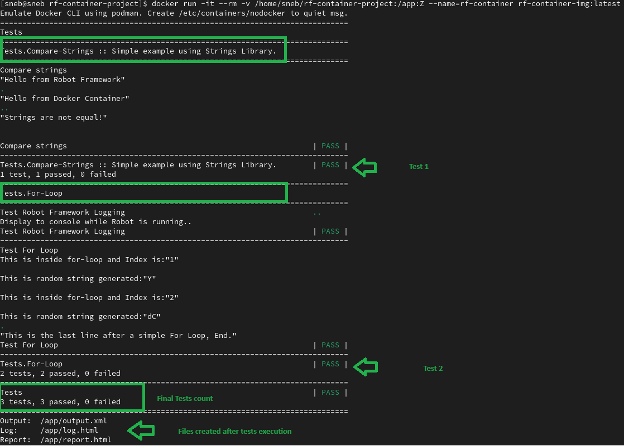
You can see that there was a total of three tests (one test to compare strings test suite, and two tests of for-loop test suite) executed within the container, and the container was disposed after it finished test suite execution. You can verify that with docker ps command, and it will not list the container that you’ve created in earlier step. See Figure 11:

It has also stored files on the local directory, as we’ve supplied that with the option -v in docker run command. See Figure 12.

Step 5: Verify Results for Your Robot Framework Tests
Once you have run your Docker container, it’s time to verify your test results. Three files are created when you execute Robot Framework test suites.
Output files contain all the test execution results in machine-readable XML format. Log and report files are typically generated based on them. We have three output files, including log.html, output.xml and report.html. Let’s look at log and report files to understand how tests were executed and how much time they took.
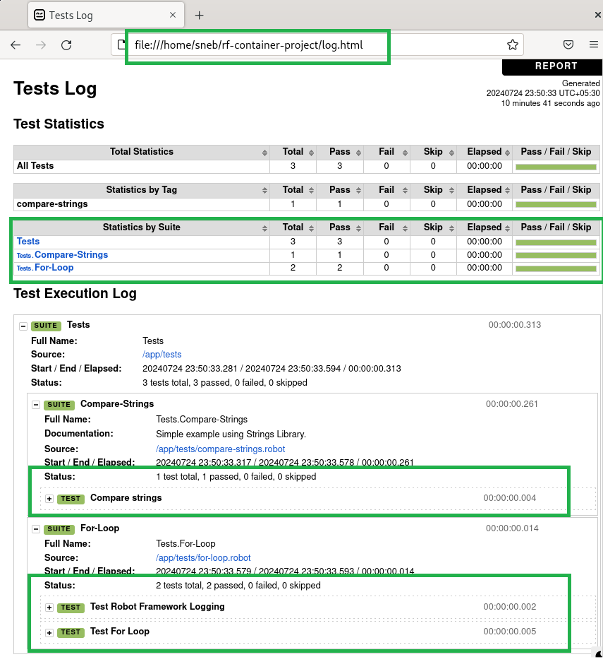
Log.html
Log files contain details about the executed test cases in HTML format. They have a hierarchical structure showing test suite, test case and keyword details. See the detailed log file in Figure 13:
structure showing test suite, test case and keyword details.
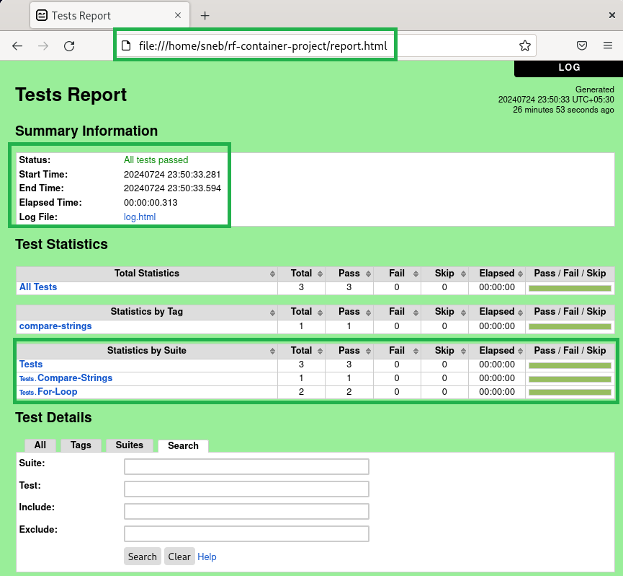
Report.html
Report files contain an overview of the test execution results in HTML format. They have statistics based on tags and executed test suites, as well as a list of all executed test cases. When both reports and logs are generated, the report has links to the log file for easy navigation to more detailed information. It is easy to see the overall test execution status from report because its background color is green if all tests pass, and bright red if any test fails. The background can also be yellow, which means that all tests were skipped. See the detailed report file in Figure 14:
Once you are satisfied with the tests results, you can mark your tests as “Passed” to conclude your testing.
Containerization and Modern Software Development
We have explored one of the approaches to create a Robot Framework Docker image and use it to run tests in containers. You can also try popular Docker images that are available for the Robot Framework. This is not the complete list, but the images below are popular:
Containerizing the Robot Framework with Docker is a forward-looking strategy that aligns with the modern demands of software development. As the industry continues to evolve, adopting such innovative practices can help you stay competitive and deliver robust, reliable software products. Happy learning.