AI On Your Laptop: Part 2 | ML on Windows
AI expert Mark Ray explains how to set up an ML environment on Windows using Anaconda

In “AI On Your Laptop: Part 1,” we covered the rationale and laid the groundwork for creating an artificial intelligence (AI) and machine learning (ML) environment on your own computer. Our goal is to have an environment suitable for learning the ins and outs of AI/ML, and to be able run small models without the need to purchase expensive add-on equipment, namely, GPUs. While GPUs (graphics processing units) are essential for large model development and training, they are unnecessary when you’re just starting out to learn the basics. In future articles, I’ll cover GPUs and the operating system that manages them, but for now we will set that subject aside.
Artificial Intelligence vs. Machine Learning
One thing I want to make clear is my use of the terms “artificial intelligence” and “machine learning.” I will use the term machine learning more than artificial intelligence for a very good reason: There are five main areas, or “tribes,” of AI research. These days, most of this research is focused on only one of these tribes: the “Connectionist,” or neural network, tribe. Broadly, the path of nomenclature looks like this: We have artificial intelligence, of which machine learning (neural networking) is a subset, and further, “deep learning” (more complex neural networks) is a subset of machine learning.
So, when we talk about AI, we’re referring to a very broad, umbrella term that encompasses many different philosophies. Machine learning, on the other hand, refers to a particular subset of this umbrella term with very distinct implementations. Throughout this article series, I’ll refer to machine learning, much more than I will refer to artificial intelligence, the former being a much more technically accurate description of what we’re trying to study.
How to Implement ML on Windows
Okay, let’s get to it and have some fun! I chose to show you how to set up a machine learning environment on Windows first because it is the operating system that most of us use in our day-to-day computing lives. The components needed to successfully implement ML on Windows are also more easily installed and configured than, say, on Linux, because you can choose to have installation wizards guide you through much of the process. Added to that, your end-state after installation will be a GUI-driven environment where you can point and click your way through many basic functions. Before we get started, I want to emphasize two critical points you need to keep in mind:
- Make sure to increase the size of your paging file to at least double the amount of installed RAM you have.
- Do not install your ML environment as “administrator!”
We covered the first point in Part 1, but my second point needs to be emphasized and explained. You must always install an ML environment as a “normal user.” In both Windows and Linux, the installation of ML components will both add to and alter pathing, and the last thing you want is to have your ability to run things like Microsoft Office, a web browser or any other productivity application compromised with paths they don’t understand. It is counterintuitive, but the less privilege you have during ML installation, the better, in both operating systems. Under Windows, your account can have local administrator privilege, but must not be the actual “administrator” account. Please take this to heart.
Core Components of ML Environments
Okay. With this very important caveat in mind, let’s continue. What are the core components you’ll need to install to create a fully functioning ML environment? There are several, and literally thousands of optional elements. Here they are, and they are the same for both Windows and Linux:
1. Anaconda
Anaconda is the environment into which you will install all other ML components. Think of Anaconda as the foundation for the ML house you will build. Anaconda will create a sort of software-based virtual machine on your computer, isolated from other system properties, with its own exclusive command structure.
2. Python
Python is the programming language for AI/ML. Many other languages like C, Julia and Rust as development environments can be found in the ML ecosphere, but Python has 99% of the market share. There is no getting around it: In order to learn ML effectively, you will also need to learn some Python. You won’t need expert skills, but a general understanding of the language is essential.
3. Jupyter Notebook
Think of Jupyter Notebook as a word processor for Python. You can torture yourself, writing Python code on the command line, or you can make coding a breeze with Jupyter Notebook. JP will offer hints to make your code both runnable and easier to understand with formatting suggestions, highlighting, and mistake flagging. There are many alternatives to Python command-line coding, but none offer the ease of use of Jupyter Notebook.
4. PowerShell
A Windows based, Anaconda environment comes with its own version of PowerShell, the indispensable command interpreter. After you become comfortable navigating all the GUI features of your ML environment, you’ll probably want to get granular—and faster—by using command line functions. The Anaconda/ML version of PowerShell you can install is specifically tailored with ML in mind and lets you perform functions unavailable to “normal” Powershell users.
5. A “Framework”
There are many aids to which you can turn for help in both your learning and development of an ML model. In the world today, two of these have the lion’s share of the market: Meta’s PyTorch and Google’s TensorFlow. Think of these frameworks as massive libraries that come pre-canned with thousands of coding routines all nicely packaged and ready to use; without these frameworks, you would need to spend countless hours coding line after line, tedious at best. With PyTorch or TensorFlow, you can reduce your coding time by up to 70%. A word about these frameworks: Like Python, you will not need to become an expert in PyTorch or TensorFlow to use them effectively, a general knowledge and understanding of how it is they do what they do is fine for education and beginning development purposes. But there is no getting around it, you will need to learn one – or both – of them.
6. Python Packages
In my own ML development efforts, I rely on index servers. These are software hubs where I can download all manner of pre-compiled packages to both aid and cut my development time. An index hub is a server that contains links to these downloadable packages, making it convenient to search for and obtain packages for just about any programming task you may have. As an example, the index hub I rely on the most has links to more than 8,000 Python packages. You read that right: 8,000! These days, there is very little need to do Python/ML programming from the ground up. With frameworks and index servers, coding becomes, if not a breeze, then at least orders of magnitude easier than it would be without these tools.
Building Your ML Environment
Let’s start. After you’ve enlarged your paging file, you will need anywhere from 50–100GB of free disk space for your ML environment, depending on how fancy you want to get with your initial implementation. Open the web browser of your choice and navigate to the Anaconda download page.
You will come to a screen that looks like Figure 1.

Enter your email address and agree to receive helpful hints—you’ll find them worthy of your attention and study. After entering your email, you will be taken to a screen that looks like Figure 2.
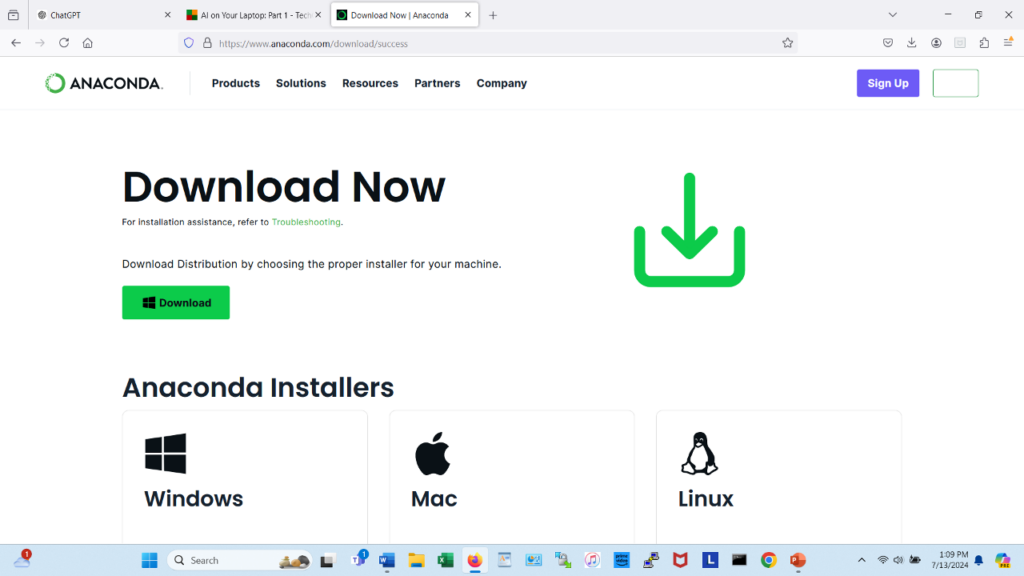
Click on either the green “Download” button or the big “Windows/Python3.12 – 64 Bit Graphical Installer” icon to start downloading Anaconda (I recommend the latter method). It will take a few minutes to download and will consume about 1GB of disk space. If you are running Microsoft Windows prior to version 10, you will need to download an older version of Anaconda because many of the features of Python 3.12 are incompatible with the older OS. I’m going to assume here that you are up to date on your OS and are running the latest code.
Click on the downloaded executable (as of this writing, “Anaconda3-2024.06-1-Windows-x86_64.exe”) to begin the installation. You need to be prepared that each step in the Anaconda installation process will be slow. You must be patient and resist the impulse to cancel the installation because you think something is hung or has gone wrong. Before long, you’ll get a screen that looks like Figure 3.
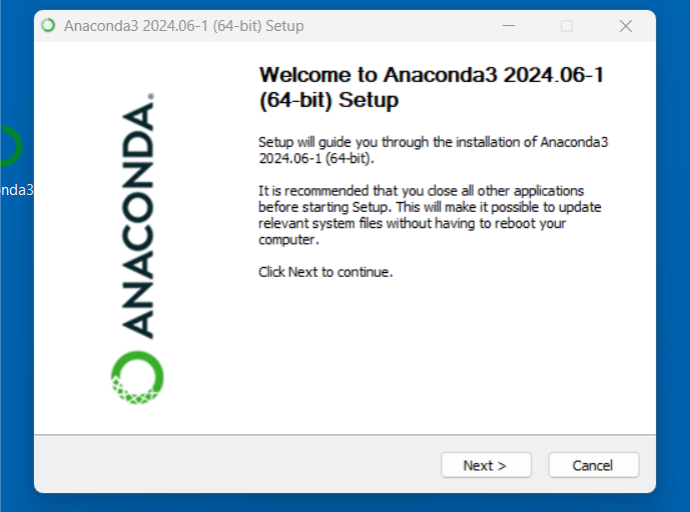
Click on the “Next” button and agree to the terms of service. Clicking “I Agree” will take you to the next screen where you have a choice of installing Anaconda just for yourself, or for every user on your computer. Take the default of “Just Me (recommended)” and click “Next.” The installer will ask you for an install location. Take the default. You’ll see the initial installation will consume about 5GB of disk space. Clicking “Next” will take you to the most critical screen of the installation as seen in Figure 4.
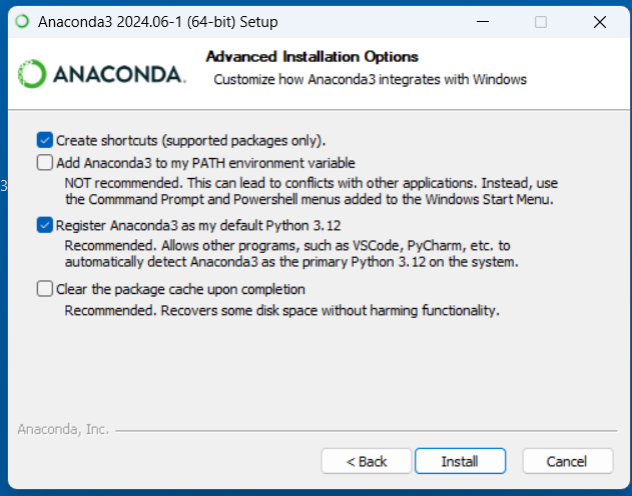
Take the defaults here. Do not, under any circumstances, click on the button that adds Anaconda to your PATH environment variable. This selection is for users who will use their computer for nothing except Anaconda and machine learning, a dedicated system with no other function. Most of us do not fall into this category. With that caveat in mind, click on “Install.” During the installation, click on the “Show details” button to see what’s happening under the covers. Depending on your processor speed, the installation might take considerable time; like I said before, be patient.
If your installation is successful, you will get a screen like that in Figure 5.
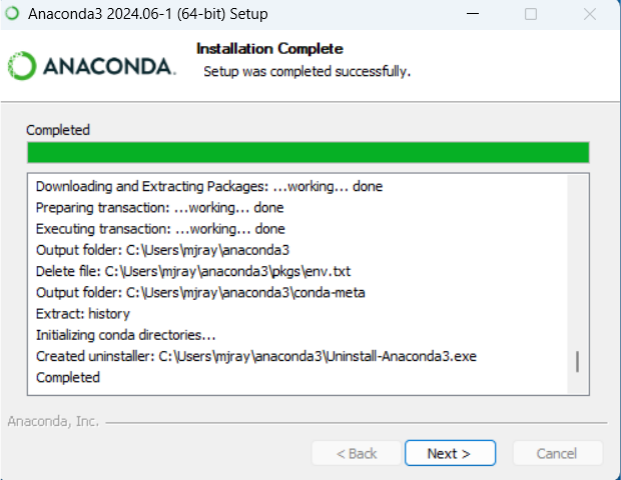
Click on “Next” to continue. (In the unlikely event your installation is unsuccessful, use the program manager in your Windows control panel to uninstall Anaconda. Reboot your system and try the installation again.) Ignore the offer to “Code in the Cloud with Anaconda Notebooks” and click “Next.” The screen presented (Figure 6) will be your last installation task—accept the defaults and click “Finish.”
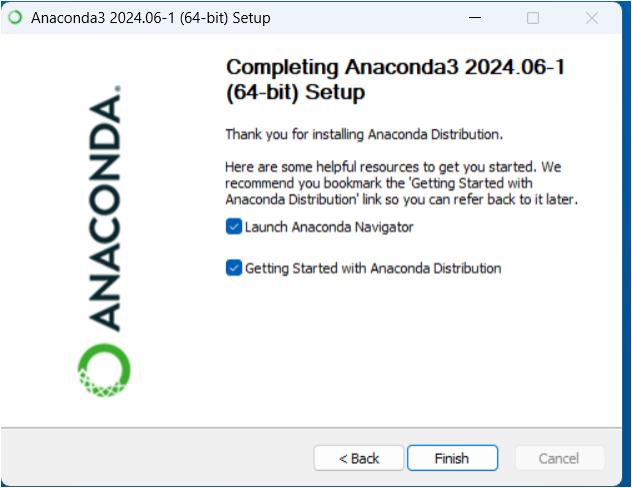
After hitting “Finish,” you will be taken to a website where you can opt in for useful educational resources. It’s up to you whether to take advantage of these; generally, the Anaconda supplied learning tools are quite good, so this is something you may want to consider. Also, after clicking “Finish,” you will see a big green snake eating its own tail appear on your screen—don’t worry, this isn’t some virus coming to crash your system; it’s the Anaconda mascot. After a fashion, you will see a screen that asks you to update Anaconda Navigator; skip this for now. Clicking on “No Remind Me Later” will bring you to the foundation for all your ML work on Windows: Anaconda Navigator (see Figure 7).
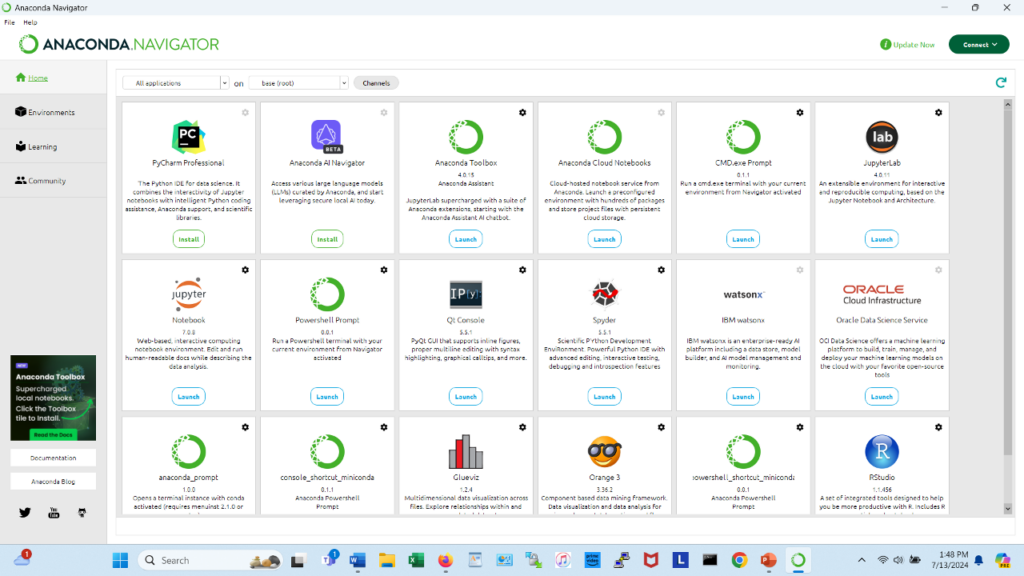
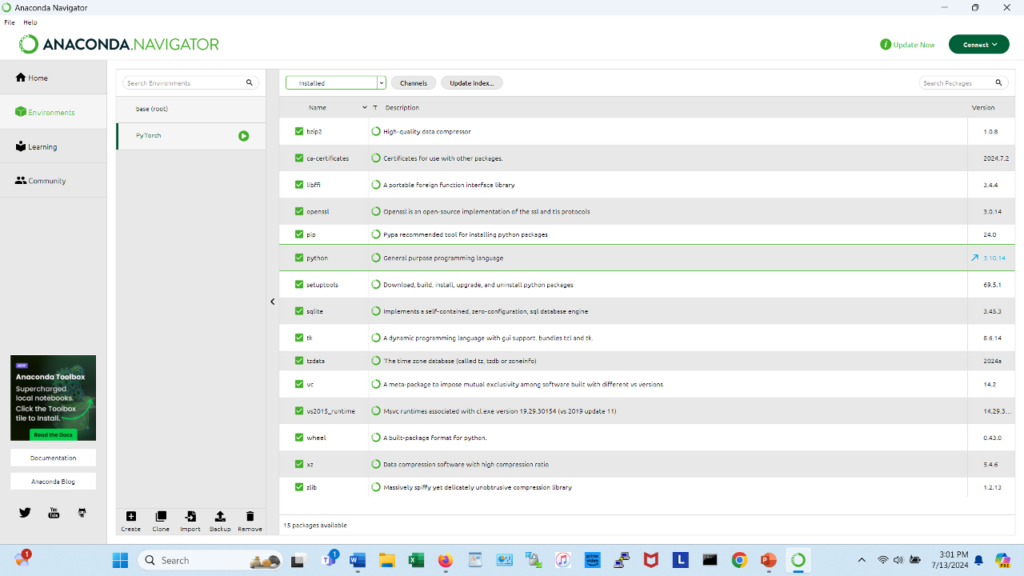
At this point, you have a fairly complete ML environment installed on your computer. Perusing the Anaconda Navigator GUI, you will see options to install other software packages that will aid you in your ML learning efforts. See the icons for “Jupyter Notebook” and “Powershell Prompt?” Get some practice installing these into your “Base” ML environment.
Wait a second, “base?” What do I mean by that? Look again at Figure 7. Near the top of the Anaconda Navigator window, you will see two dropdown menus labeled “All Applications” and “base(root).” Remember how I said Anaconda was the foundation upon which you will build the rest of your ML house? The “base” ML environment is the last layer of bricks in that foundation; you won’t use the base environment for much, but it is the last essential item you must have before you customize your ML environment to your own taste and needs.
At this point, we have covered a lot of territory, but there is still more to go. I would encourage you to explore all the options you have at your command within Anaconda Navigator. Incidentally, from now on, I’m just going to shorten the name to “Anaconda.” Click away and explore every option. Don’t worry about making a mistake; even if you mess up your installation completely, it will be good practice to start all over and run through the installation process again. As you start out on your ML journey, you are going to find you will learn just as much from your mistakes as you will from doing things without error. Take a good amount of time to get familiar with Anaconda, and do not rush.
Adding Functionality
By now, you have installed Anaconda on your own computer, as well as some of the essential ancillary packages like Jupyter Notebook and Powershell. You have played around with these packages, exploring every nook and cranny they have to offer. You have built your foundation, now, let’s design the house!
Environments
Refer to Figure 7, where you see Anaconda laid out with its many default options. Our goal in these next steps will be to add frameworks and packages such that you will have a lot more ammunition in your ML arsenal. To accomplish this, you need to add more “environments” to your base Anaconda installation.
Earlier, I said Anaconda was like a virtual machine, fenced off from the rest of your computer in a self-contained repository. Now, you can create another environment on top of that original “base” environment. Again, look at the “base(root)” drop down in Figure 7. We will not use the base environment much, if at all; as I said earlier, it’s the last layer of bricks in your overall foundation. Now, mouse over to the “Environments” selection on the left of Anaconda. Clicking on this selection will take you to a screen like that in Figure 8.
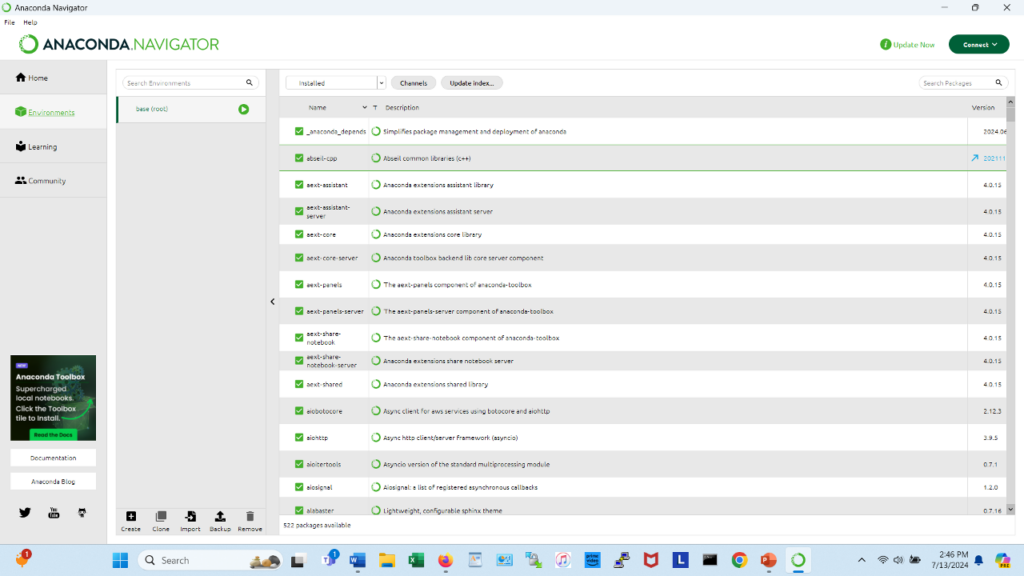
Here, you’ll add a framework, a massive library of ML programming code, as well as some essential supporting Python-based software packages. Down at the bottom of this window, you will see several selections: Create, Clone, Import, Backup and Remove. You’ll create a new ML environment that builds upon the base environment and adds functionality. At this point, we need to choose a framework on which to build this new environment, and we will pick one of these two: PyTorch or TensorFlow; products developed by Meta and Google, respectively. In my own development efforts, I use both, but what I’ve found over the last few years is PyTorch is easier to learn than TensorFlow. I want to say straight up that both are excellent in what they do, but let’s stick with the easier path in these beginning steps.
So, we’re going with PyTorch as our framework. Click on the “Create” button and you will be presented with a screen like that in Figure 9.
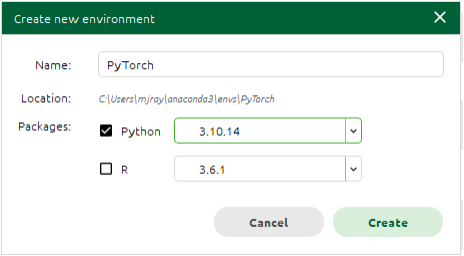
Since we are creating a new PyTorch-based environment, we will name it simply “PyTorch”. You will also see a drop-down menu labelled “Python” with a version automatically selected; usually this will be a Python 3.12.x version. This is the most recent version of Python, but it has a few bugs with some ML packages, so click on the dropdown and select either version 3.11 or 3.10; in my own work, I usually go with 3.10, but this is up to you. Click on “Create.”
As with all other Anaconda installation tasks, this will take some time so be patient. You’ll see a status bar at the bottom right of your screen with what is happening spelled out toward the left. Let it chug. When the installer finishes, you will see a screen like Figure 10, with “PyTorch” heading a column in the mid-left. Toward the right, you will see a list of packages that have also been installed by default. At this point, click on the “Home” button where you will be taken to a screen that looks like the original Anaconda page, but is in fact the landing page for your new PyTorch environment.
About PIP and CONDA Installers
There are two main installers for ML packages out in the world. The first is PIP, which is a recursive short for “PIP Installs Packages,” and CONDA, which as the name suggests, is a shortening of Anaconda. When you are building any ML environment or installing packages on Windows, you will generally use PIP. There is an important distinction between PIP and its competitor, CONDA: While you can use both on an x_86 platform running Windows, generally you will want to use CONDA to install on the IBM PowerPC platform because of a few quirks that platform has (important for readers of TechChannel) with ML environments. Since we are using x_86 and Windows in this article, our focus will be on PIP.
It’s time to get your hands dirty. You have used the Anaconda GUI to install Jupyter Notebook, the Anaconda Powershell utility and anything else you cared to experiment with. Going forward, you have a choice: continue to use the GUI for further package installations or use the command line. I must tell you that using the command line for package installs is easier than the GUI, so this is the method I’ll give you here. On your landing page, open the Anaconda Powershell application. You will be presented with a window that looks like Figure 11.
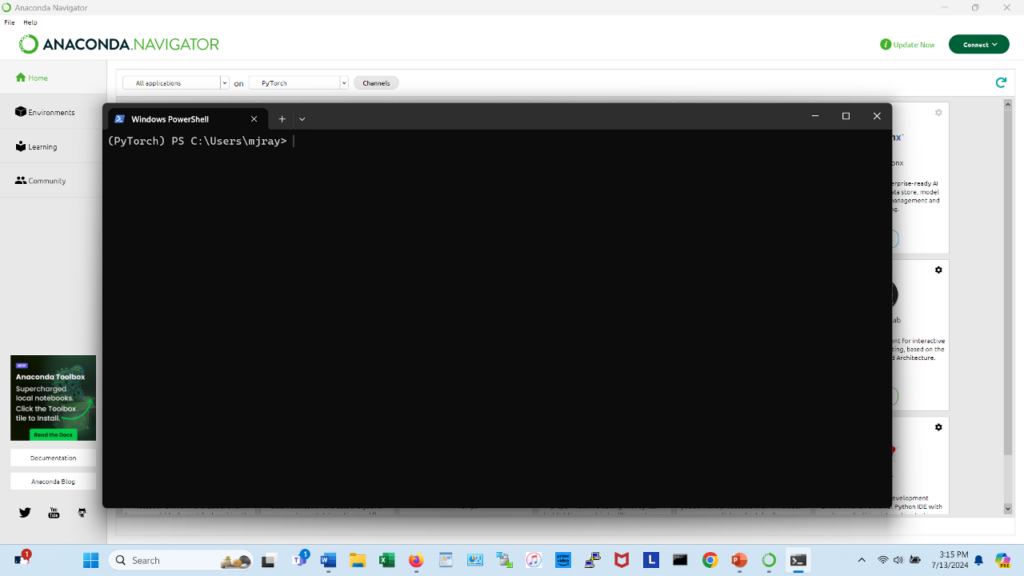
First, you’ll install PyTorch as your framework. The short name for PyTorch is just “torch,” and this is the name you will enter in your install command:
pip install torch <enter>
The installer will chug, and you will see PyTorch installed with several supporting packages. If your installation is successful, you will see a screen like Figure 12 saying the installation was indeed successful and listing the names of the supporting packages.

Congratulations! You now have turned your own computer into a fully functional AI (and ML) system! In future articles, I will get you going on your learning path, but I think we will close here, for now. We have covered a LOT of ground. We have prepared our computer to manage an AI/ML environment and installed the necessary software to make that happen. We have selected a framework for our learning and development environment and learned how to use PIP in those installations. But before I sign off, I want to recommend a few more packages you will find indispensable for your ML environments; installing these will also give you practice with PIP and show you how it resolves dependencies. Using PIP, install the following packages:
numpy

scikit-learn

torchvision

torchtext

pandas

matplotlib
Take note of all the dependent packages PIP will install along with these. Make sure to Google them—or ask your newfound friend ChatGPT about them—and fully understand what they do.
In future articles, we will continue our machine learning journey: I will show you how to use Jupyter Notebook as your editor of choice to build a simple ML model, load data into it and then run it for a purpose. You will learn more terminology and concepts, eventually equipping you to start developing your own ML models or run some of the thousands that are available on public hubs. I will then show you how to use large language models like ChatGPT, Gemini and CoPilot to cut down on your development time as well as directing you to places where you can download publicly available code to use in your models.
But next up: Installing a machine learning environment on Linux.
Until then, good luck and happy learning!