8 Steps to Running Your First Containerized Python Application on zCX
In this step-by-step tutorial, BMC Software’s Sujit Neb explains how to run a Docker container using zCX
Running a Docker container on IBM Z is now easier than ever before. IBM z/OS Container Extensions (zCX) makes it possible to integrate Linux on IBM Z applications with z/OS. Application developers can develop and package an application coded with their choice of programming language—such as Python, Go, etc.—and data centers can operate popular open-source packages, Linux applications, IBM software, and third-party software together with z/OS applications and data.
In this step-by-step tutorial, I am going to share a sample Python program that launch the server exposed to port 8080 to say “Hello from Docker!” Readers should already be familiar with basic concepts related to Docker, containerization, Python and zCX.
First, we will test the concept on a Windows system, and then we will implement the same on zCX.
Step 1: Write a Python Script to Print the Docker Logo and the Text Message
We start with coding a Python script that displays the Docker logo on the server. We’ll name the Python script ‘app.py.’ It is assumed here that the reader uses a machine running Microsoft Windows OS. The script can be saved anywhere on the local machine. We have saved our script in the documents folder under “Docker-init-python-app.”
The script will look something like this:
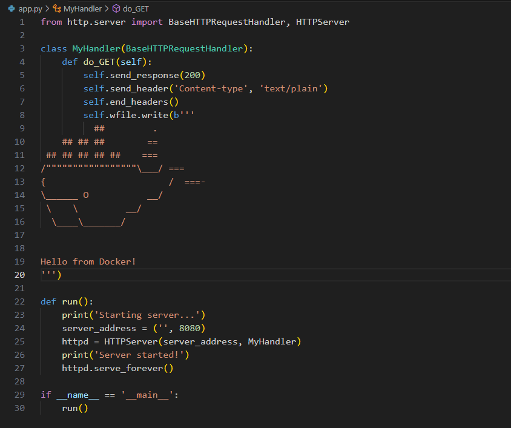
The script makes use of the http.server Python module. We make use of the VS Code IDE to write this Python program, but you may choose an IDE that you are comfortable with. Here, we are using port 8080 to expose the server.
Warning: http.server is not recommended for production. It only implements basic security checks. Read more on http.server library here.
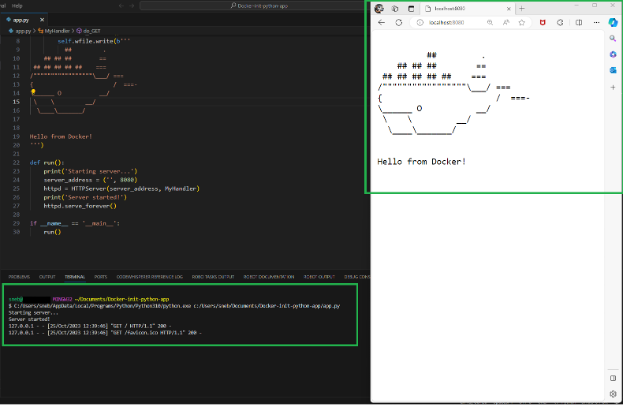
Step 2: Test the Python Script ‘app.py’
To ensure that the Python script works as expected, execute the script from your Windows command prompt or any terminal you’re comfortable using. Change directory (using command ‘cd’) to the location where your script has been saved and execute the command python “app.py.”
If the script executes successfully, you should see the message “Hello from Docker!” along with the Docker logo on the web browser. (See Figure 2.)
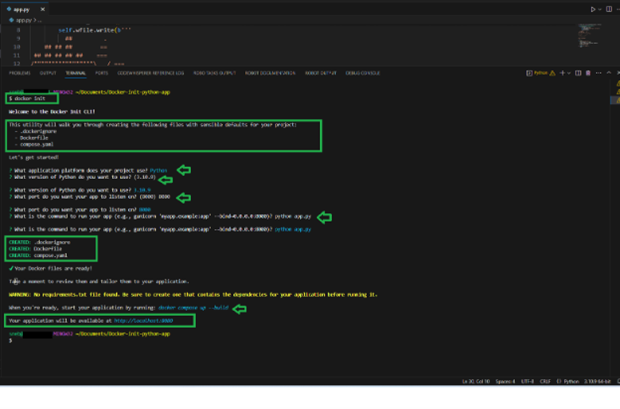
Step 3: Get the Dockerfile and the ‘compose.yaml’ File to Containerize the Python Script ‘app.py’
You can write a Dockerfile manually or you can use the feature ‘docker init’’ with the folder where you have a source code present. For the purpose of our demonstration, we’ll use the ‘docker init’ command to get a relative Dockerfile and the ‘compose.yaml’ files created.
Before you do this step, ensure that you have Docker installed for Windows or any other OS you are using.
Once you run the ‘docker init’ command you will get following prompts, and you must supply a few inputs to those to create the Dockerfile and ‘compose.yaml’ files. (See Figure 3)
I have highlighted user inputs in bold in the terminal window below.
 $ docker init

Welcome to the Docker Init CLI!

This utility will walk you through creating the following files with sensible defaults for your project:
  - .dockerignore
  - Dockerfile
  - compose.yaml

Let's get started!

? What application platform does your project use?  [Use arrows to move, type to filter]
  Go - suitable for a Go server application
> Python - suitable for a Python server application
  Node - suitable for a Node server application
  Other - general purpose starting point for containerizing your application
  Don't see something you need? Let us know!
  Quit

? What version of Python do you want to use? (3.10.9)  >> Press Enter (It uses default version of python if not supplied)

? What version of Python do you want to use? 3.10.9
? What port do you want your app to listen on? (8000) 8080

? What port do you want your app to listen on? 8080
? What is the command to run your app (e.g., gunicorn 'myapp.example:app' --bind=0.0.0.0:8080)? python app.py

? What is the command to run your app (e.g., gunicorn 'myapp.example:app' --bind=0.0.0.0:8080)? python app.py

CREATED: .dockerignore
CREATED: Dockerfile
CREATED: compose.yaml

✔ Your Docker files are ready!

Take a moment to review them and tailor them to your application.

WARNING: No requirements.txt file found. Be sure to create one that contains the dependencies for your application before running it.

When you're ready, start your application by running: docker compose up --build
Your application will be available at http://localhost:8080
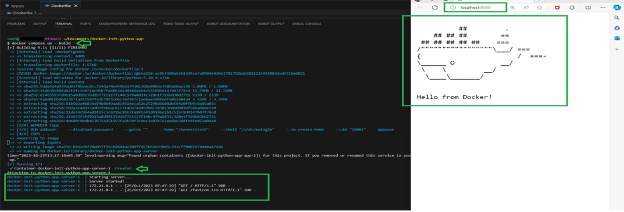
Step 4: Start the Container and Run the Python Script ‘app.py’
Now that you have successfully created the Dockerfile and ‘compose.yaml’ files, let’s test the containerized Python app. On Windows system, I will demonstrate Docker Compose, using ‘compose.yaml’ to start the container running our Python app.py. Run the command ‘docker compose up –build’ to get the container running. Verify that using the web browser displaying an output of your application that is available at http://localhost:8080 (see Figure 4).
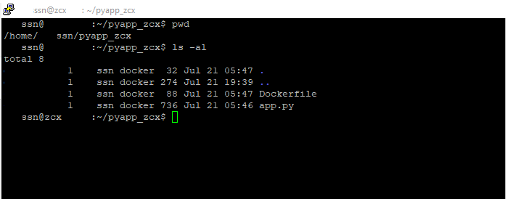
Step 5: Copy Files to zCX
I have copied files from my Windows system to the server running a zCX instance. Files are copied under ‘/home/username/pyapp_zcx’ directory (see Figure 5). You can create these files directly on zCX server. You can see that I have copied the Dockerfile and the ‘app.py’ script. That’s enough for us to create and run the container.
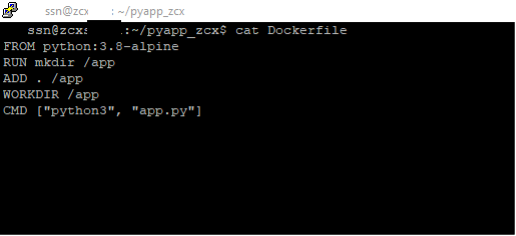
Dockerfile contents are as below (see Figure 6).
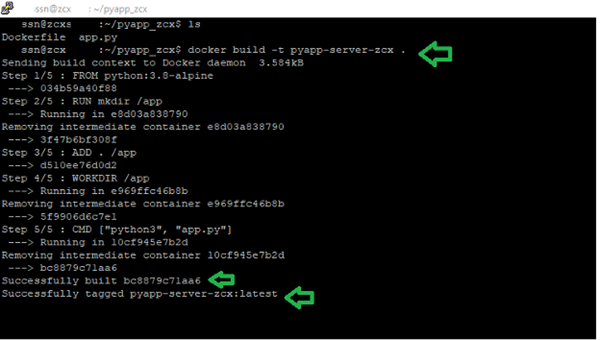
Step 6: Build the Docker Image on zCX
Run the command ‘docker build -t pyapp-server-zcx’ to build a Docker image (see Figure 7). Make sure to run this command where you have the Dockerfile and ‘app.py’ script present in the directory.
Step 7: Run the Docker Container on zCX
Now you have all required things to run your first Python application in the containerized form on zCX.
Run the command ‘docker run -d -p 8080:8080 –name pyapp-server-container-zcx pyapp-server-zcx’ to run a Docker container using the Docker image that we created in Step 6. Here, the port being used in 8080 and the Docker image used is ‘pyapp-server-zcx.’ This command will create a container with the name ‘pyapp-server-container-zcx pyapp.’ (See Figure 8.)

Step 8: Test and Verify the Docker Container Running on zCX
Verify that the Docker container is running before you test your Python application. Run the command ‘docker ps’ to display status of the Docker containers running on the system. (See Figure 9.)

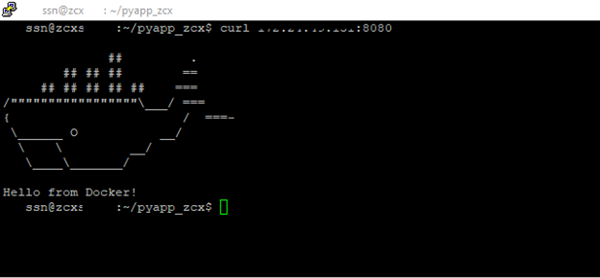
Now, you can run either the ‘curl localhost:8080’ or the ‘curl ipaddress-of-zcx-server:8080’ command to test your container and get the desired output (i.e., Docker logo and the text message “Hello from Docker!”) (See Figure 10.)
This concludes the tutorial. To summarize, we looked at how to create Docker image and run a Docker container using Dockerfile and Docker Compose. If you don’t have Docker Compose available on zCX, then Dockerfile can be used to run your container. You can also apply these concepts and methods to similar use cases as necessary.