Using the New SQL HTTP Functions (Part 2)
How to use the new SQL HTTP functions to integrate indigenous IBM i technologies (such as Db2 and RPG) with open-source applications
In Part 1 of this series, we introduced some new HTTP functions. Indeed, they are fantastic additions to the set of IBM i Services available through SQL. Today, we will explore how they can be used to integrate indigenous IBM i technologies (such as Db2 and RPG) with open-source applications.
Gluing Node.js and Db2
A community member recently asked for a way to query the Domain Name System (DNS) from a database program. Unfortunately, (at the time of writing) no such feature exists in SQL. So, how can one accomplish this task? Naturally, there are several ways. Since the gethostbyname() API is available in ILE, one could write a stored procedure or table function that calls it. If more advanced DNS activity, like explicitly querying a specified DNS server is needed, one can piece together the sockets network functions to get the job done.
However, this is a pretty simple task in most high-level programming languages (HLLs). For instance, DNS ability is included in the core Node.js runtime. Let’s glue Node.js to Db2, shall we?
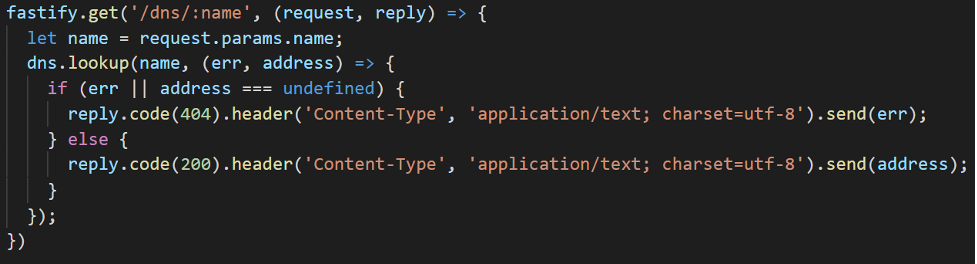
As it turns out, the use of REST or HTTP APIs is one of my favorite techniques for integrating RPG or SQL with open-source languages, and the new HTTP functions make it faster and more reliable. So, let’s use this method to solve the DNS problem. In this example, we stand up a service with Node.js and the Fastify web framework. To start, I create a really simple HTTP route that uses the Node.js DNS module to perform a simple lookup.
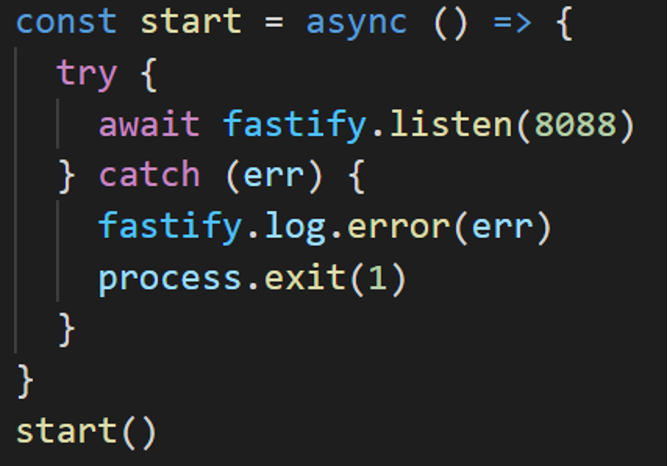
And I start it just as I could any other fastify web application (Figure 2):
When I run this Node.js program, I have an API available on localhost port 8088. And, since I have HTTP functions in SQL, it’s pretty simple to call it (Figure 3). Just use QSYS2.HTTP_GET!

That was quick! Now, let’s move on to something more advanced. Let’s say, for instance, you wanted:
- The complete DNS record information
- The ability to query a specific DNS server
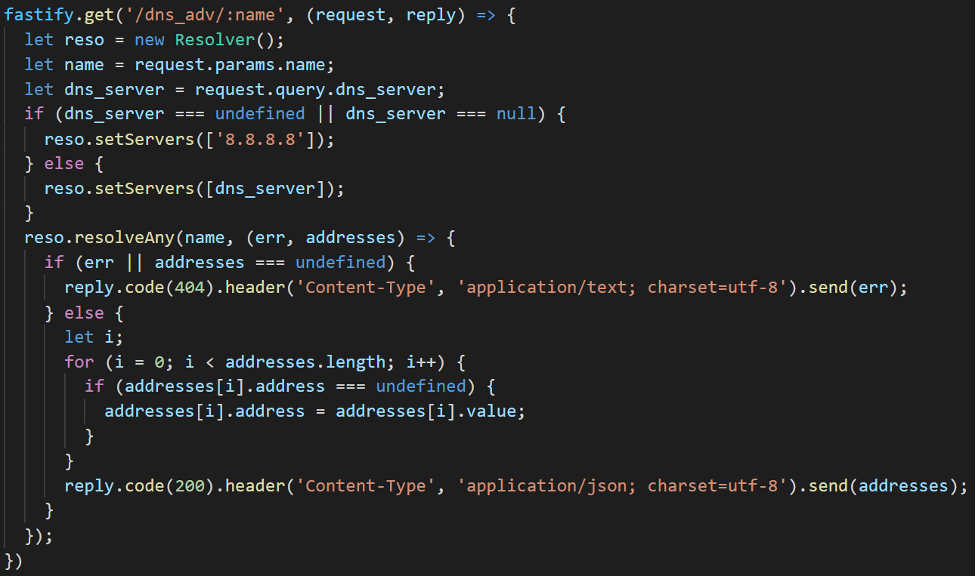
Let’s just make another API that returns this extra information. In this example, we default the DNS server to “8.8.8.8” if the caller doesn’t specify, and we use the Node.js Resolver class to get perform the query. See Figure 4 for a more advanced DNS API.
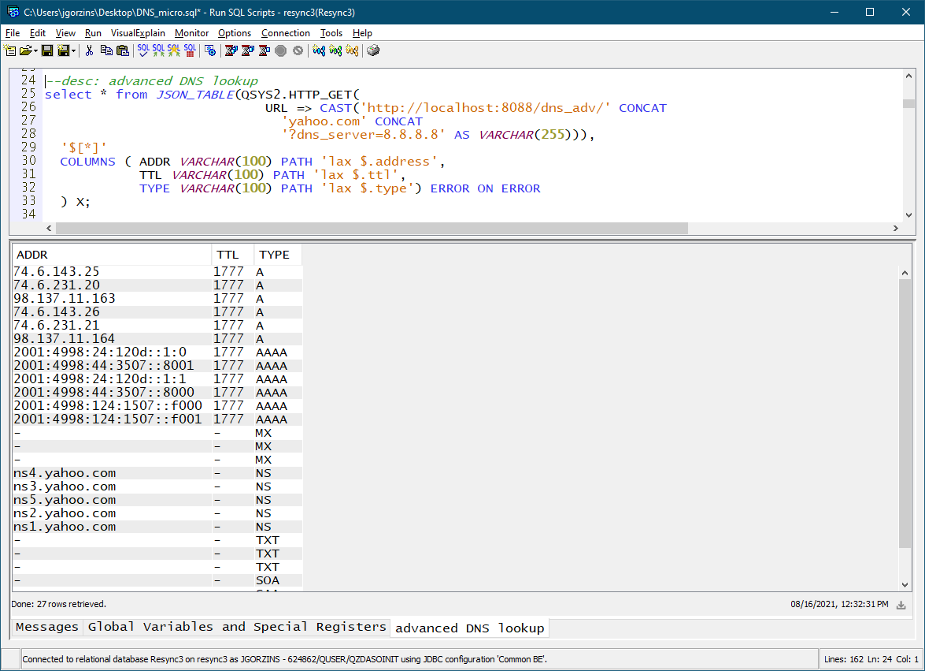
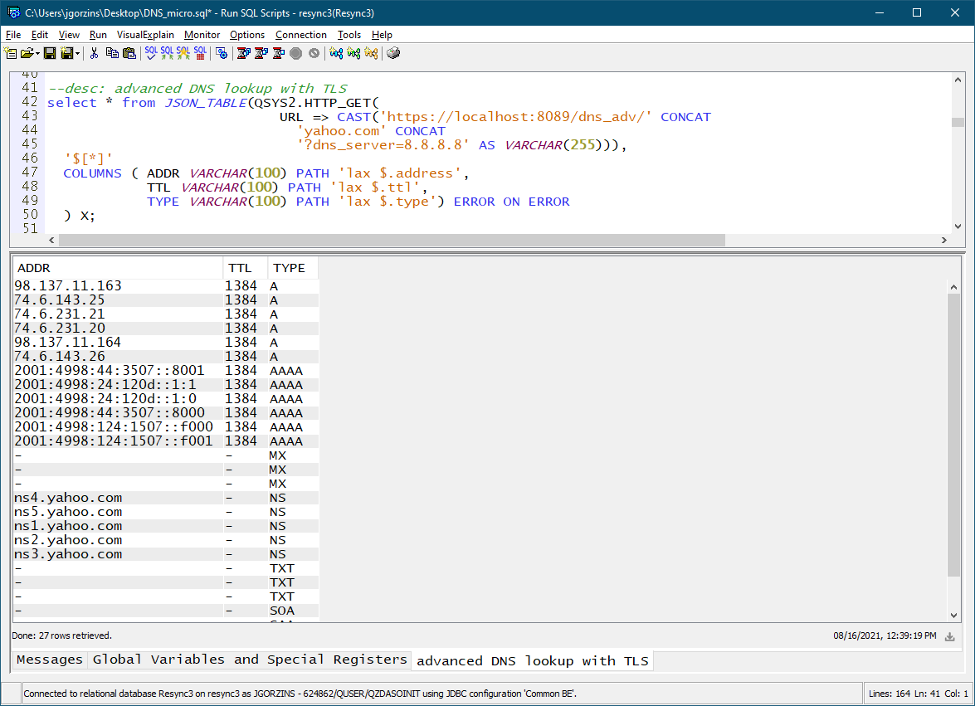
Once we start that Node application, we can call it with QSYS2.HTTP_GET, specifying not only the target domain but also the name server to use. Rather than just getting an IP address, we get the full set of DNS records (IANA documentation on these can be found here). For a visual of calling the advanced DNS API from SQL, see Figure 5.
At this point, since the Node.js service is listening on localhost, it should be safe from external interference. However, if you wanted to encrypt your local service with TLS, you certainly can. First, generate a server certificate. To do a self-signed certificate, you could run the following commands:
- openssl genrsa -out file.key 2048
- openssl req -new -sha256 -key file.key -out file.csr
- openssl x509 -req -in file.csr -signkey file.key -out file.cert
This will generate a key, generate a new certificate signing request, and sign it, resulting in a signed certificate. Then, add the TLS options to fastify, like demonstrated in Figure 6:

In this example, I also changed the startup port to 8089. Now, I can query my service with HTTPS instead of HTTP! However, I quickly run into an error (shown below), informing me that the “certificate is not signed by a trusted certificate authority.” This is because I am using a self-signed certificate (see Figure 7).

To remedy the problem, import the necessary certificate authority into Digital Certificate Manager (DCM). This can be done with the DCM GUI. Alternatively, the open source DCM Tools provides a “dcmimport” command to import the certificate, by running:
- dcmimport –fetch-from=localhost:8089
When complete, your certificate is trusted by DCM, and the HTTPS call can succeed (see Figure 8):
The World at Your Fingertips!
It’s quite common for people to be writing an RPG application and encounter a new challenge that’s easily done in Python or PHP or Node.js. In today’s example, we showed how Node.js functionality can be accessed with SQL, but it could have been any function, implemented in any language. So, don’t get hung up on the DNS functionality in this example, but observe that the technique opens up the world to the Db2 or RPG programmer.