How to Send Messages to a Slack Channel From a JCL Job That Executes on z/OS
It’s very easy to send messages to a Slack channel from a JCL Job that executes on z/OS. You can achieve this by following the steps below:
NOTE: I worked on this proof-of-concept (POC) project on my local Windows machine and therefore, it’s assumed that all instructions pertaining to this POC are tried out by the readers on a system running Microsoft Windows OS.
Step 1: Create a New Slack Workspace and Channel
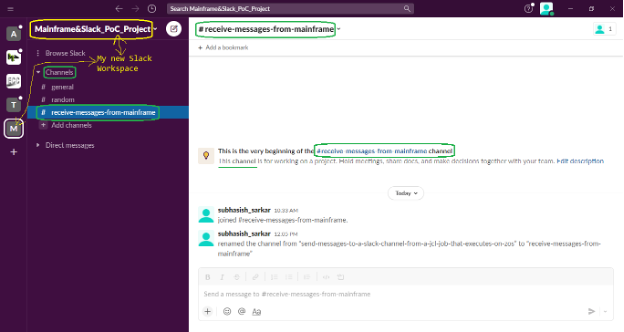
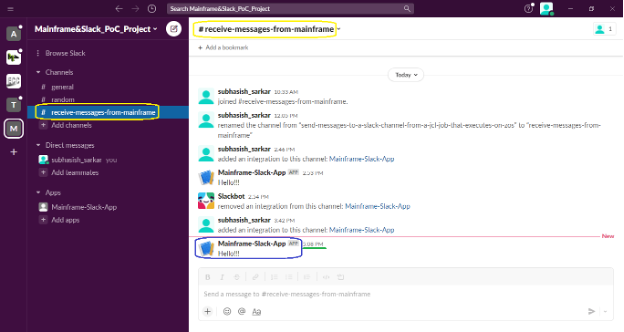
I suggest that you create a new Slack workspace and channel for the purpose of this POC project. For my purpose, I have created a new Slack workspace and channel named “Mainframe&Slack_PoC_Project” and “#receive-messages-from-mainframe” respectively. Please refer to Figure 1 below.
Step 2: Set up a Slack ‘Incoming WebHooks’ Integration
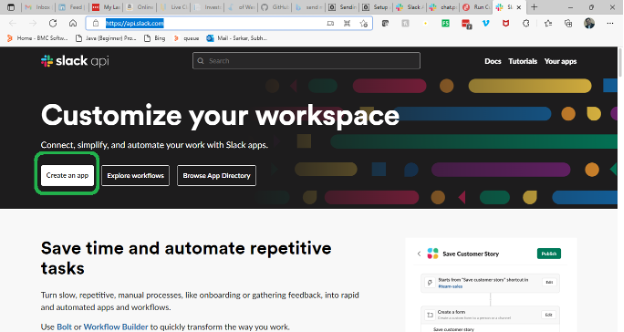
Head over to Slack API | Slack. Click on the “Create an app” button. Please refer to Figure 2 below.
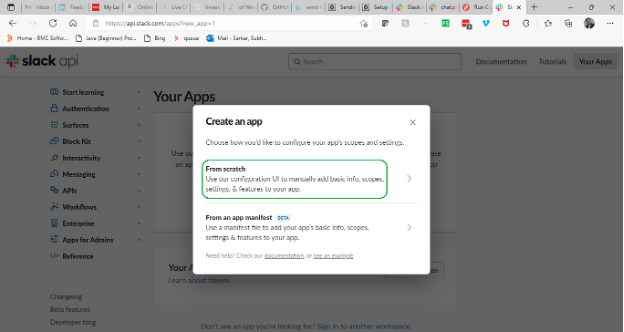
Click on the “From scratch” option. Please refer to Figure 3 below.
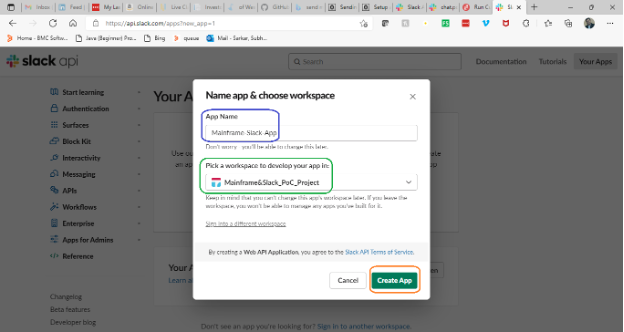
Provide a name for your app. You can change this name later if you wish or need to. You will also have to select a workspace to develop your new app in. Remember that you can’t change the app’s workspace later and if you leave the workspace (that you select to develop your new app in) any time in the future, you won’t be able to manage any apps you’ve built for it. Select the new workspace that we had previously created for this POC project. Finally, click on the “Create App” button. Please refer to Figure 4 below.
Click on the “Incoming Webhooks” option. Please refer to Figure 5 below.
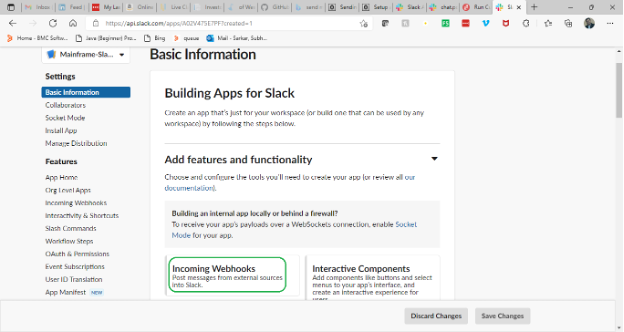
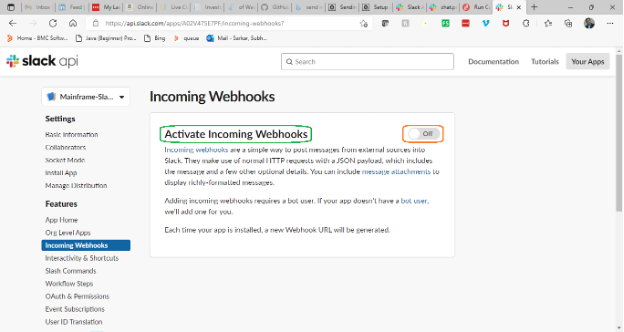
Incoming webhooks are a simple way to post messages from external sources into Slack. They make use of normal HTTP requests with a JSON payload, which includes the message and a few other optional details. By default, Incoming Webhooks are deactivated. Please refer to Figure 6 below.
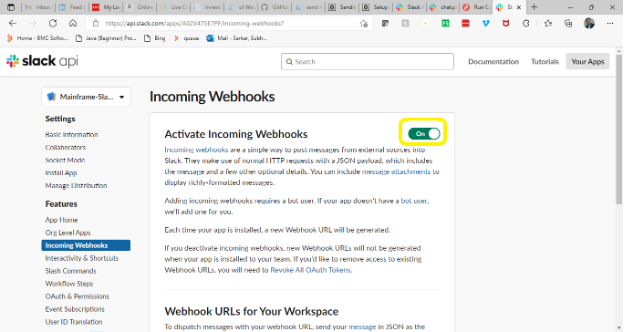
Activate Incoming Webhooks. Please refer to Figure 7 below.
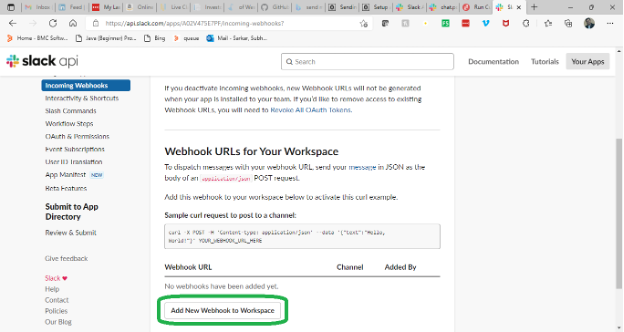
Click on the “Add New Webhook to Workspace” button. Please refer to Figure 8 below.
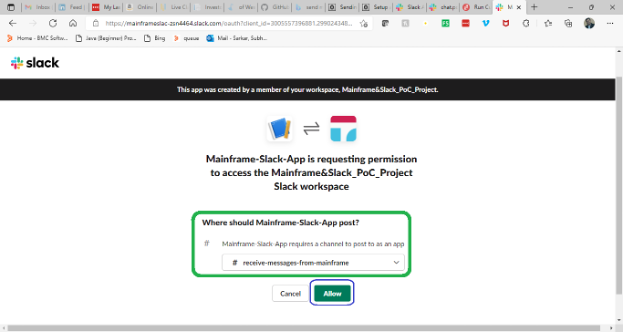
Your new app requests permission to access the workspace. You need to select a channel which the app can post to as an app. Finally, click on the “Allow” button. Please refer to Figure 9 below.
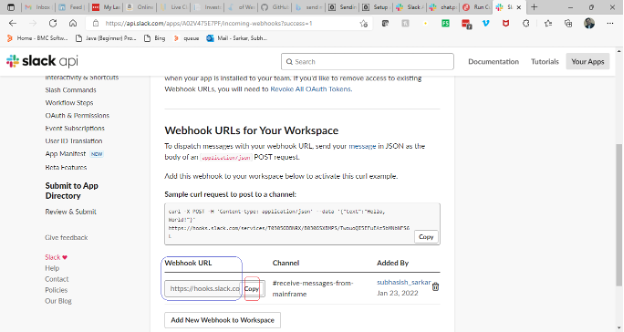
Copy the newly added Webhook URL and paste it in a text file. We will need the Webhook URL shortly. Please refer to Figure 10 below.
Step 3: Test the Newly Added Webhook URL
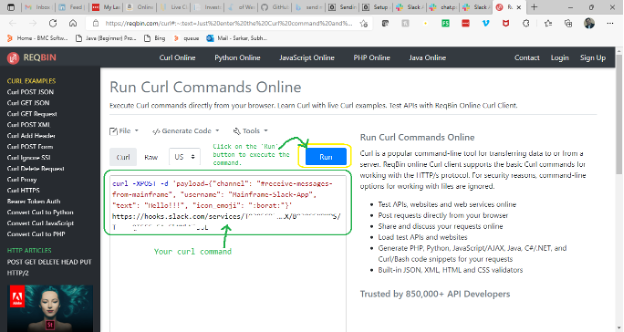
Prepare a sample curl request to post a message to the Slack channel. Please refer to the code snippet below.
curl -XPOST -d 'payload={"channel": "#receive-messages-from-mainframe", "username": "Mainframe-Slack-App", "text": "Hello!!!", "icon_emoji": ":borat:"}' https://hooks.slack.com/services/ZnnnnZZZZZZ/ZnnnZZZZZZZ/ZzzzzZZnZZzZZznzZZzZZZnZPlug in the correct Slack channel name. Remember that the channel name starts with a # symbol. The username is the name of the app which you had just created in the previous step. Use your Webhook URL that you had previously copied to a text file.
Go to the URL Run Curl Commands Online (reqbin.com). We will now execute the curl command online directly from our browser. Please refer to Figure 11 below.
A status code of 200 indicates success. Please refer to Figure 12 below.
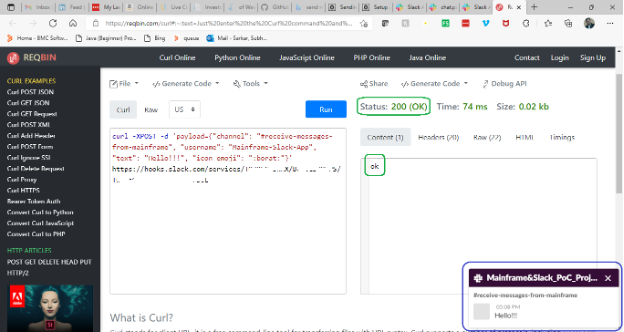
Go to Slack and confirm that the message has indeed been posted to the Slack channel. Please refer to Figure 13 below.
Step 4: Code the Python Script That Sends Messages to the Slack Channel
Let’s name the Python script file Mainframe-Slack.py. Save the file anywhere on your local Windows machine. The Python code should look like this (see Figure 14):
import requests
import random

SLACK_WEBHOOK_URL = 'https://hooks.slack.com/services/ZnnnnZZZZZZ/ZnnnZZZZZZZ/ZzzzzZZnZZzZZznzZZzZZZnZ'
SLACK_CHANNEL = "#receive-messages-from-mainframe"

CICD_DevOps_Pipeline_Execution_Status_Notification_Alert_Map = {
    "EMOJI": {
        "ThumbsUP": ":white_check_mark:",
        "ThumbsDOWN": ":fire:"
    },
    "ALERTTEXT": {
        "ThumbsUP": "SUCCESS",
        "ThumbsDOWN": "FAILED"
    },
    "ALERTMESSAGE": {
        "ThumbsUP": "Everything is good!!! The CI/CD DevOps Pipeline has completed its successful execution.",
        "ThumbsDOWN": "I smell something burning!!! The CI/CD DevOps Pipeline execution has halted because of some failure at some stage in the pipeline."
    },
    "COLOR": {
        "ThumbsUP": "#32a852",
        "ThumbsDOWN": "#ad1721"
    }
}

def Send_Message_To_Slack_Channel(Either_Zero_Or_One):
    if(Either_Zero_Or_One == 0):
        CICD_DevOps_Pipeline_Execution_Status = 'ThumbsDOWN'
    if(Either_Zero_Or_One == 1):
        CICD_DevOps_Pipeline_Execution_Status = 'ThumbsUP'

    data = {
        "text": "CI/CD DevOps Pipeline Execution Status:",
        "channel": SLACK_CHANNEL,
        "attachments": [
        {
            "text": "{Emoji} [*{AlertState}*] CI/CD DevOps Pipeline Executionn {AlertMessage}".format(
                Emoji=CICD_DevOps_Pipeline_Execution_Status_Notification_Alert_Map["EMOJI"][CICD_DevOps_Pipeline_Execution_Status],
                AlertState=CICD_DevOps_Pipeline_Execution_Status_Notification_Alert_Map["ALERTTEXT"][CICD_DevOps_Pipeline_Execution_Status],
                AlertMessage=CICD_DevOps_Pipeline_Execution_Status_Notification_Alert_Map["ALERTMESSAGE"][CICD_DevOps_Pipeline_Execution_Status]
            ),
            "COLOR": CICD_DevOps_Pipeline_Execution_Status_Notification_Alert_Map["COLOR"][CICD_DevOps_Pipeline_Execution_Status],
            "attachment_type": "default"
        }]
    }
    Result = requests.post(SLACK_WEBHOOK_URL, json=data)
    return Result.status_code

Send_Message_To_Slack_Channel(random.randrange(0, 2))
Figure 14. Python script file code content
Key in correct values for the variables SLACK_WEBHOOK_URL and SLACK_CHANNEL and your script is ready!
When you execute the script, random.randrange(0, 2) returns either a 0 or 1 depending on which the success (when a 1 is returned) or failure (when a 0 is returned) related messages are posted to the Slack channel.
Step 5: Test Your Python Script
Open your Windows command prompt or any other terminal that you are comfortable using and CD to the path where you have saved the Python script file. Type in python “Mainframe-Slack.py” and press enter.
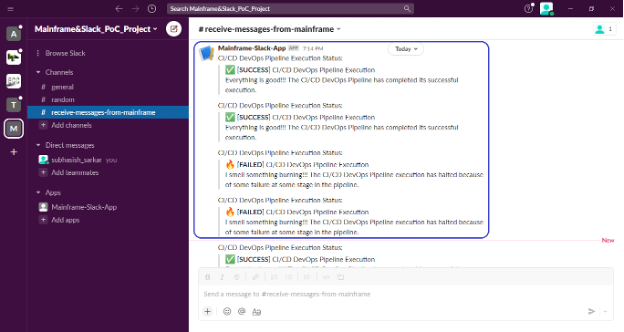
Once the script has successfully completed its execution, you should see relevant messages posted to the Slack channel. Please refer to Figure 15 below.
Step 6: Code the JCL Job That Executes the Python Script ‘Mainframe-Slack.py’
The JCL Job should look like the following:
//SLACKMSG JOB (5990),'EXECUTE-PYSCRIPT',CLASS=A,MSGCLASS=X,
//  REGION=0M,NOTIFY=&SYSUID
//*****************************************************************
//BPXBTCH1 EXEC PGM=BPXBATCH
//STDPARM  DD   DISP=SHR,
//         DSN=MVSSAS.CZAGENT.JOBS.SS.PERSONAL(ZOSSLACK)
//STDOUT   DD   SYSOUT=*
//STDERR   DD   SYSOUT=*
//CEEDUMP  DD   DUMMY
//*
//
Content of the “YOUR.PDS(ZOSSLACK)” member should be:
sh python3 /home/user/Mainframe-Slack.py
NOTE: python3 is the Python installation path; for example, /usr/lpp/IBM/cyp/v3r8/pyz/bin/python3. Check with your system administrator if you’re not sure about the path where Python installation has been done at your shop.
/home/user/ is the USS path in which we are going to create the Python file, Mainframe-Slack.py. You can reuse the code in the Python script that you have already created and saved on your local Windows machine.
BPXBATCH is a utility that is used to run shell commands or executable files through the batch facility. You can invoke BPXBATCH from a batch job, as we have chosen to do in our case. To know more about the BPXBATCH utility, you can refer to the IBM documentation at BPXBATCH utility – IBM Documentation.
Step 7: Run the JCL Job That Executes the Python Script ‘Mainframe-Slack.py’
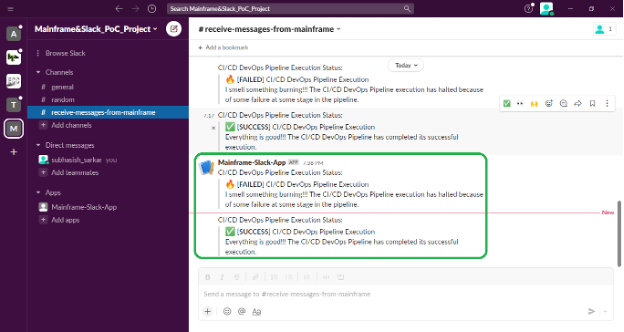
Submit the JCL Job. If everything goes as expected, the Job should complete its execution with RC=0000. Once the Job completes its successful execution, relevant messages should successfully get posted to the Slack channel. Please refer to Figure 16 below.
You have now been able to successfully send messages to your Slack channel by executing a JCL Job on z/OS.